· Alexander · Homelab · 4 min read
SSH Login Logging to Discord via Webhooks
Log SSH logins to Discord using Webhooks and pam.d
So in an effort to get better at log monitoring, especially for SSH, I decided to setup automatic login/logout webhook notifications. Since I already use Discord for gaming, etc. I figured it would be easy to set up a private server for just my homelab and have everything log to it. I ended up using pam.d to invoke a script that handles the webhook.
Creating the Webhook
Now I am going to assume that you already have a Discord account, if not you can sign up here, and you have a server setup with a text channel already created. To create the webhook, hover over the text channel you want to use and click on the settings gear. In the channel settings click on “Integrations” and then on “Webhooks”. Click “New Webhook” and change the name to something you will recognize. Then click “Copy Webhook URL” and paste it into notepad so we have it for later. You can then save and exit the channel settings view.
 Creating a Discord webhook through the channel settings
Configuring SSH to Use the Webhook
Now that we have our webhook created we can setup our SSH daemon to send a webhook every time we log in and out of our Linux host. To do this SSH to your host and run the following command to create our script file:
sudo touch /sbin/sshd-loginNow edit the file and add the following script to it.
sudo nano /sbin/sshd-login#!/bin/bash# add to /sbin/ and make executable# edit /etc/pam.d/sshd and add:# session optional pam_exec.so /sbin/sshd-login# to bottom of the file
WEBHOOK_URL=""DISCORDUSER=""
# Capture only open and close sessions.case "$PAM_TYPE" in open_session) PAYLOAD=" { \"content\": \"$DISCORDUSER: User \`$PAM_USER\` logged in to \`$HOSTNAME\` (remote host: $PAM_RHOST).\" }" ;; close_session) PAYLOAD=" { \"content\": \"$DISCORDUSER: User \`$PAM_USER\` logged out of \`$HOSTNAME\` (remote host: $PAM_RHOST).\" }" ;;esac
# If payload exists fire webhookif [ -n "$PAYLOAD" ] ; then curl -X POST -H 'Content-Type: application/json' -d "$PAYLOAD" "$WEBHOOK_URL"fiBefore saving this file change the WEBHOOK_URL variable to match your webhook url you obtained earlier. If you want the script to @ notify you on each login/logout change the DISCORDUSER variable to include your ID. See the docs here if you do not know how to obtain your Discord user ID. Once you have your ID change the variable to "<@yourid>".
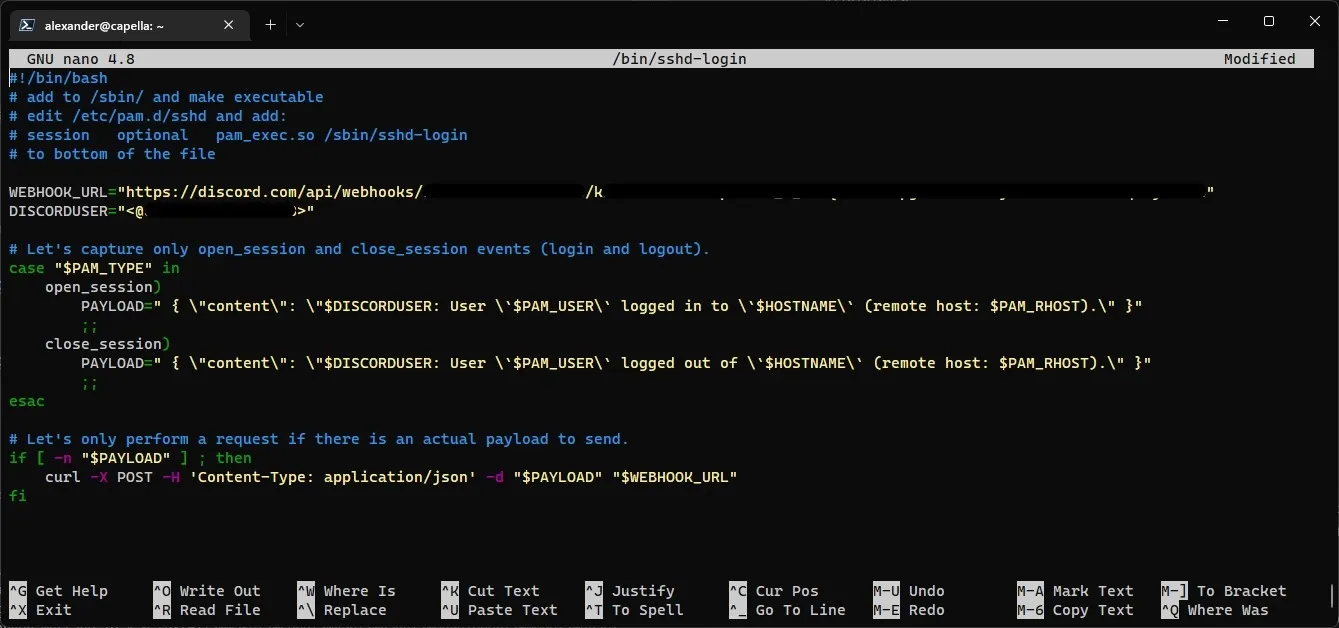 Example of a completed script setup
Once you are done changing variables save and close the file using CTRL+X then y. Then update the script to be executable and make sure the root user owns it.
sudo chmod +x /sbin/sshd-loginsudo chown root:root /sbin/sshd-loginUpdating pam.d Config
In order for our script to send webhook notifications on login and log out we need to update pam.d to invoke it. To do this we need to edit the sshd config file located in /etc/pam.d.
sudo nano /etc/pam.d/sshdAdd the following to the bottom of the sshd config file.
session optional pam_exec.so /sbin/sshd-loginSave the file by hitting CTRL+X then y. Once the file is closed we need to restart the sshd daemon.
sudo systemctl restart sshdTesting the Webhook
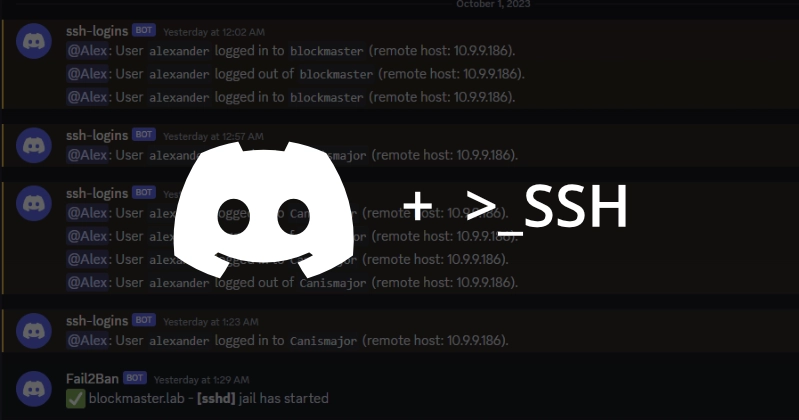
With the script added and setup exit your SSH session and log back in again. If it’s working you should get an @ notification from Discord like the example below.
 Example of SSH login notifications in Discord
Troubleshooting
If it does not send a webhook to Discord you can try one of the following troubleshooting steps.
- Check and verify your webhook URL is correct inside the
sshd-loginfile. And is surrounded by double quotes ("). - Verify that root owns the
sshd-loginfile and it’s set to be executable. - Verify
sshdconfig file in/etc/pam.dincludes thesession optional pam_exec.so /sbin/sshd-logincall at the bottom of the file.
If it still does not work, try rebooting the machine and verify if it’s working after. Let me know down below or via email if you run into any trouble!