Alex's Guide to Caddy [Part 1]

FTC: Some links in this post are income earning affiliate links.
Introduction
Exposing internal services to the internet comes with its own risks. It is highly recommended that you secure your web server host as much as possible and only expose services that are absolutely necessary! This guide will be getting your feet wet with some good default settings, but I also recommend you do your own research into these topics.
Ever wondered how to expose your home network services securely? It’s the classic tech puzzler. You could use a VPN1 to tunnel into your network, but that requires you to have the connection enabled and running. You could also use an SSH Tunnel2 or a bastion server3. Though, this requires your remote device to have the ability to SSH. Now there is another way: Reverse Proxy4! A reverse proxy sits in front of your backend services and forwards incoming web requests to them. This can also help increase security, since you are not exposing the service directly. Now the downside is that you still have to forward ports 80/443 (HTTP/HTTPS) through your firewall. However, this can potentially leave your network vulnerable to port attacks. This can be mitigated with Cloudflare Tunnel.
Cloudflare Tunnel acts as an encrypted tunnel between your server and the nearest Cloudflare data center. It requires no ports to be forwarded through the firewall. This guide series will focus on utilizing Cloudflare Tunnel with Caddy to serve / secure services hosted in Docker. It will be broken into 3 parts, so it’s not too long and easier to read through. I will be walking you through the bare minimum with a few extra security options. I recommend you do your own research as well since things change all the time.
Sorry for the wall of text but doing something like this requires a lot of information, and I’m hoping to make it easy to follow for people that are just starting out and want to learn.
Before You Begin
In order to host your own web server, with SSL, you need to have a domain registered with a registrar5. You will also need a host to run everything on. Preferably a host that can be easily secured, aka not your personal desktop! For this post I will be using a machine running Ubuntu Server and Docker. I will be walking you through the entire process (broken into 3 parts as stated above). The only things you will need to begin are a form of payment (for the registrar) and a fresh host with Ubuntu Server installed. You can use any OS but keep in mind that this guide is built around using Ubuntu Server. Some commands will be different if you are not on a Debian based OS.
Guide Parts Reference
- Registering a domain on Cloudflare, setting up the host, and deploying Caddy with Cloudflare Tunnel.

- Securing resources behind Caddy with Authelia.
- Using an internal only domain with Caddy that has SSL.
Listed on the Guides’ page as well.
Registering a Domain with Cloudflare
The first few things we need to tackle are getting a domain registered and our host setup with Docker. After that we can start setting up services, Caddy, and Cloudflare Tunnels. We are going to start off with registering the domain. Now, I highly recommend using Cloudflare for this as it will make it extremely easy to set up the tunnel later.
There are other registrars6 you can use if you want, though I will not be covering configs for them in this series.
In order to register a new domain with Cloudflare. You first need to create an account. Head over to their site, here, and follow the account creation process for a free account.
 Cloudflare Sign up Page
Once you are set up with an account, sign in and head to the billing > payment info section of your profile. Fill in your payment method and a billing address.
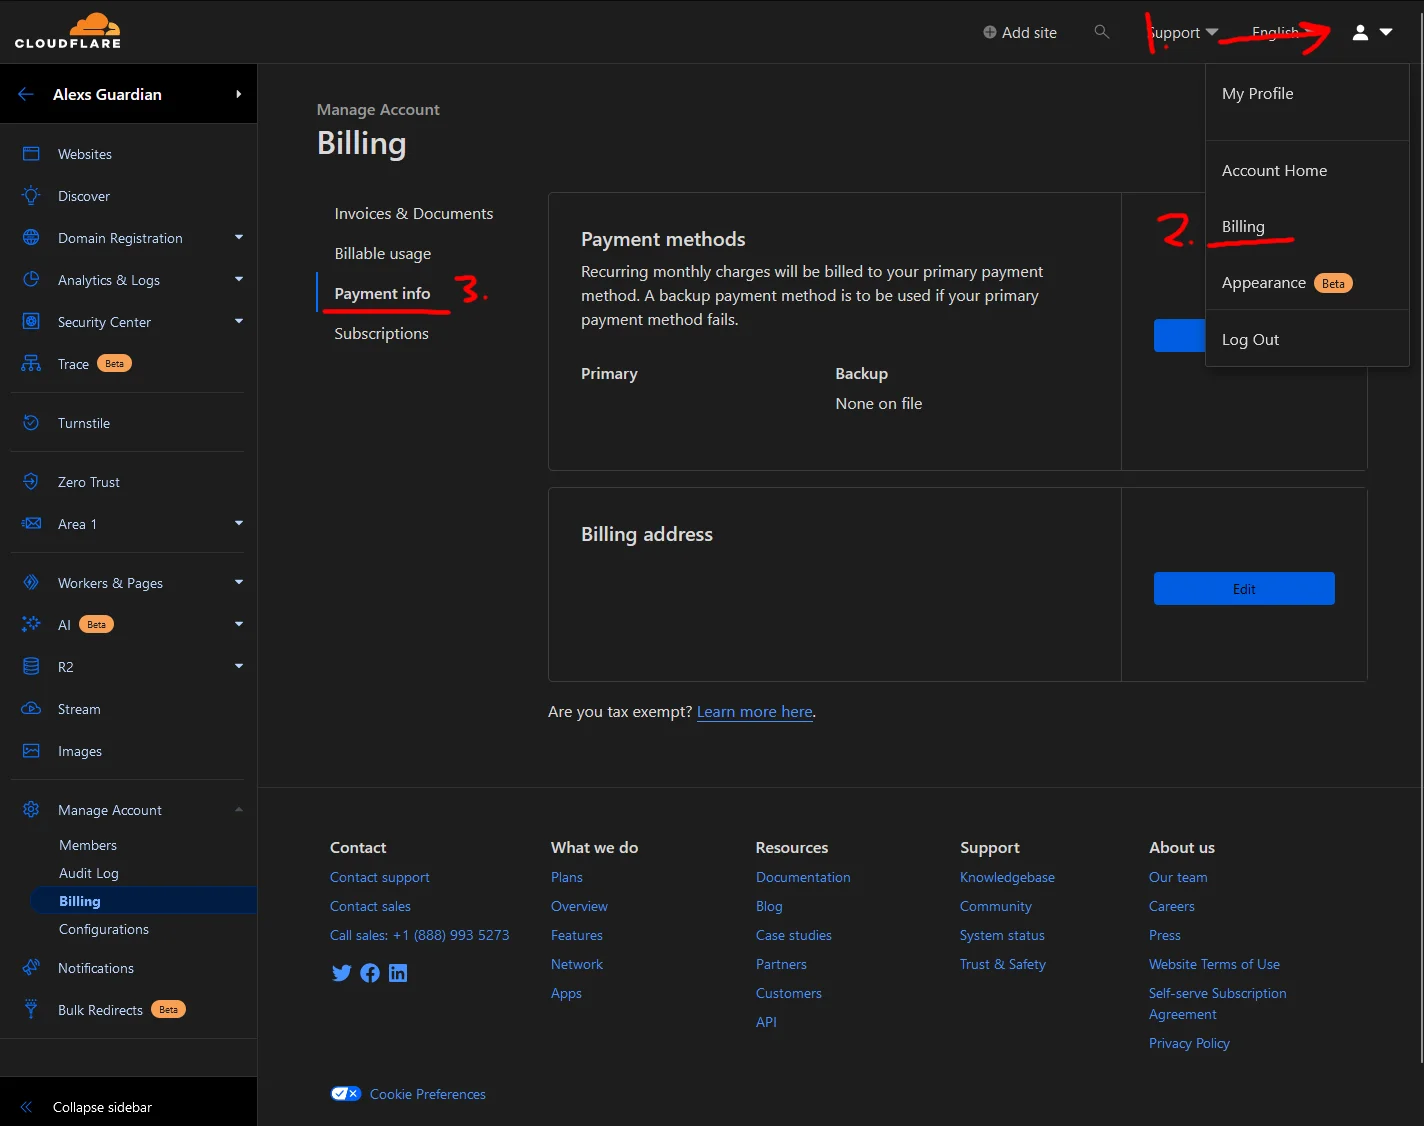 Cloudflare Billing Info
Then head back to the dashboard and enter the domain registration page.
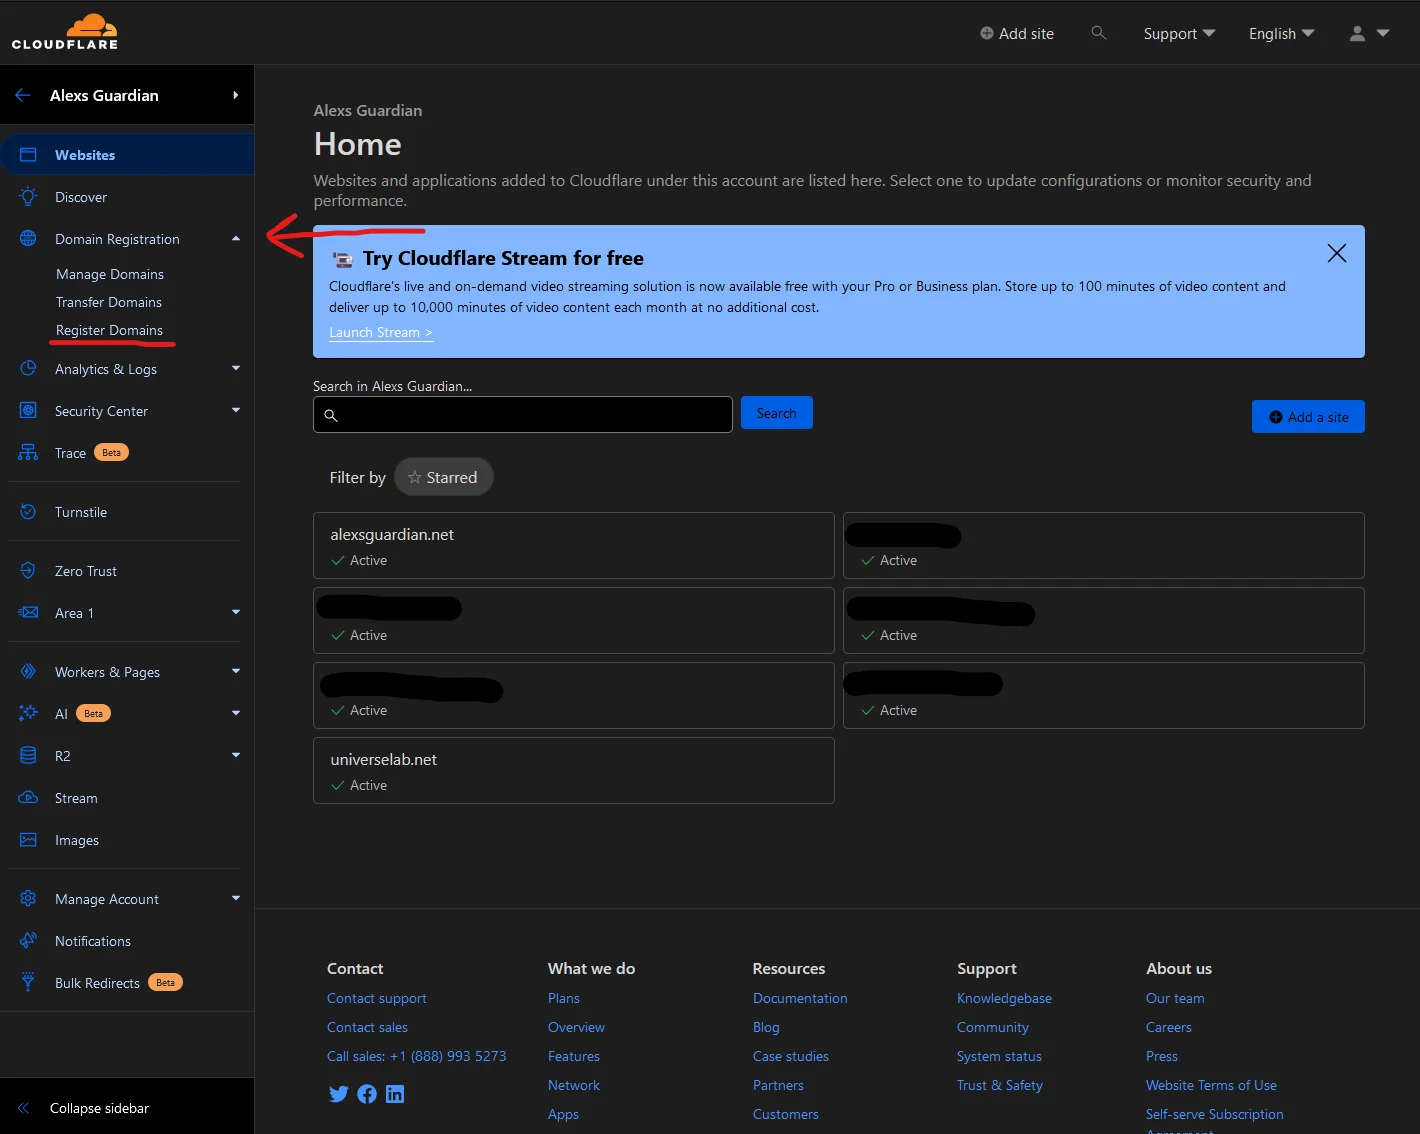 Cloudflare Domain Registering Menu
On the Register Domain page, search for a domain you’d like to use. When you find one, click on the “Purchase” link and check out. Follow the checkout process.
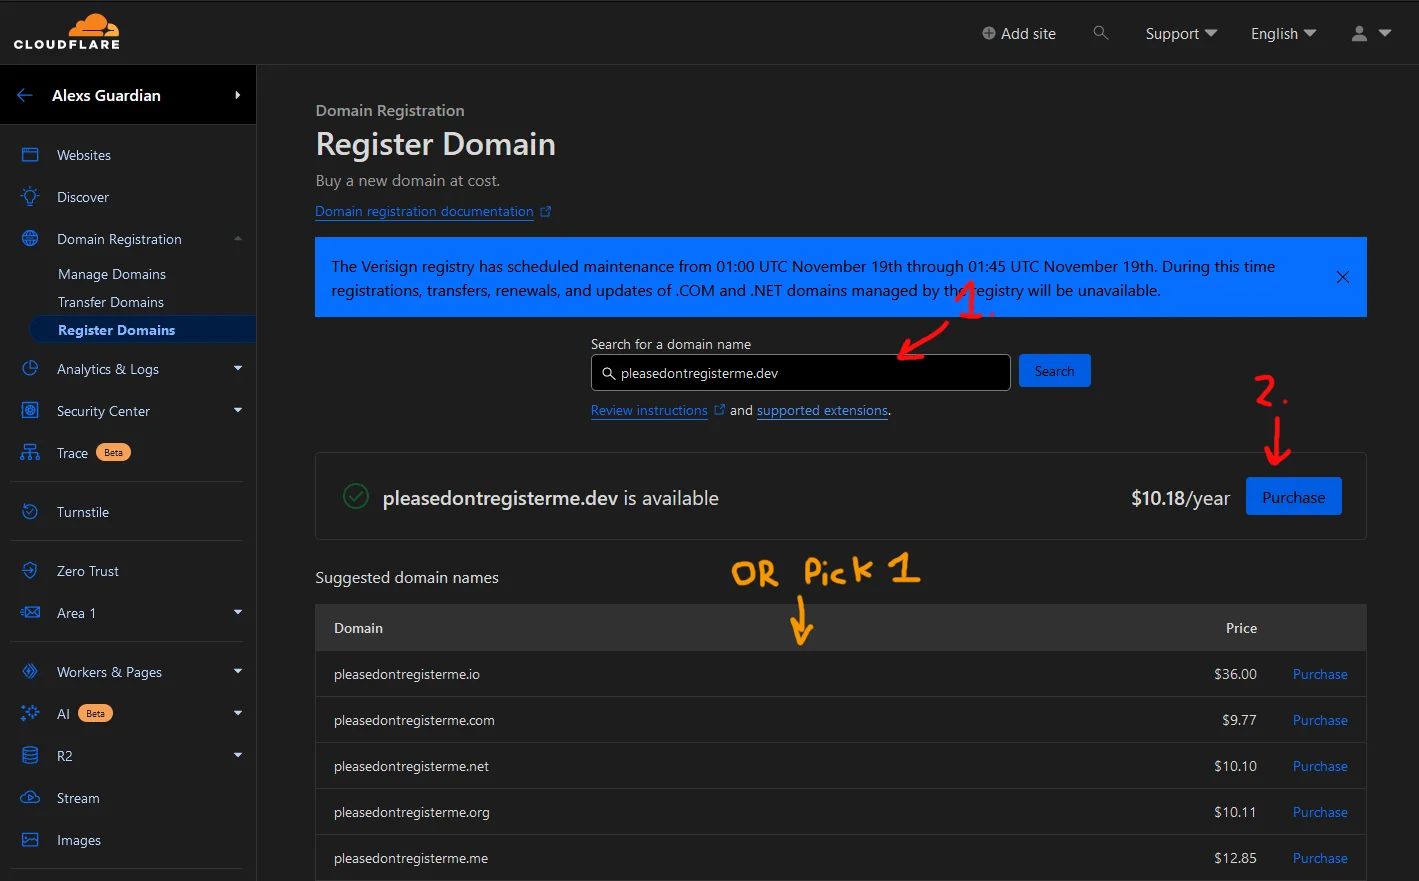 Cloudflare Domain Registering
Once you have registered your domain you should see it on the dashboard with a green checkmark and “Active” listed under it.
 An active domain in Cloudflare
Now that we have our domain registered, let’s get the host prepared!
Before continuing, I recommend going into your Cloudflare account settings and setting up 2FA/MFA so that your account is secure. I personally use a Yubikey, USB-A version, for stuff like this.
Preparing the Host
Like I stated earlier, we will be using Docker to run all our services. Docker makes it easy to spin up services in containers which can include all the dependencies. This makes it extremely easy to also blow away a service if you want to start fresh or don’t need it anymore. It also adds a layer of separation from the host which can enhance host security a bit.
Wikipedia: What is Docker?
“Docker is a set of platform as a service (PaaS) products that use OS-level virtualization to deliver software in packages called containers. The service has both free and premium tiers. The software that hosts the containers is called Docker Engine.”
SSH into your host and install Docker.
1
2
3
4
5
6
7
8
9
10
11
12
13

ssh youruser@host

# Install Docker Dependencies
sudo apt install ca-certificates curl gnupg
sudo install -m 0755 -d /etc/apt/keyrings
curl -fsSL https://download.docker.com/linux/ubuntu/gpg | sudo gpg --dearmor -o /etc/apt/keyrings/docker.gpg
sudo chmod a+r /etc/apt/keyrings/docker.gpg

# Add the Docker repository to apt sources
echo \
  "deb [arch="$(dpkg --print-architecture)" signed-by=/etc/apt/keyrings/docker.gpg] https://download.docker.com/linux/ubuntu \
  "$(. /etc/os-release && echo "$VERSION_CODENAME")" stable" | \
  sudo tee /etc/apt/sources.list.d/docker.list > /dev/null
Now update the apt sources and install Docker-CE
1
2
3
4

sudo apt update

# Install Docker
sudo apt-get install docker-ce docker-ce-cli containerd.io docker-buildx-plugin docker-compose-plugin
 Installing Docker
Now, I like to create a dedicated user to run containers in my lab. This is not a recommended method and is optional since it can be dangerous, unless you run Docker root-less as noted in the docs. This guide will not be covering how to do a root-less docker user, but it is definitely the recommended route. It does come with some limitations as noted here though. For the time being we are going to add our current user to the docker group, so we can omit sudo in every command from here on out.
“For the time being we are going to add our current user to the docker group, so we can omit
sudoin every command from here on out.”DO NOT do this in a production type environment or one that has sensitive data stored on the host…. please…
1
2

sudo groupadd docker
sudo usermod -aG docker $USER
 Adding the current user to the Docker group
Logout and log back into the host for the changes to take effect or run newgrp docker. You can then run docker to view the command help, to see if everything is working correctly.
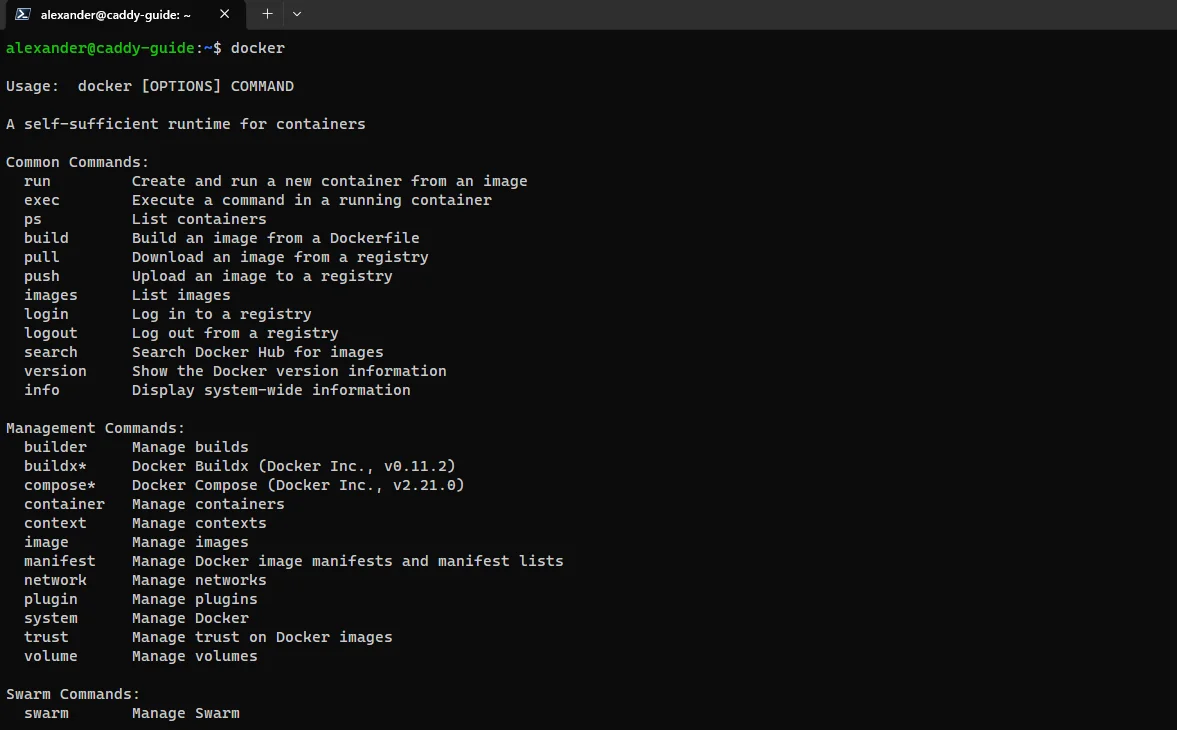 Help output from running
 docker with no parameters
Next we need to create the network that we will use for communications between Cloudflare tunnel and Caddy.
1

docker network create cf-internal-net
Preparing for Caddy
For this I will be using my custom Docker image which includes the Cloudflare DNS module7. We need this module as Caddy will not be able to do proper certificate generation, since it will not be directly exposed to the internet and will have to use the DNS challenge8 to obtain them. You can easily build your own image and if you want to learn how to do that via GitHub Actions automatically you can check out my guide series, here, and the build repo for my image here.
Create the config directories and files for Caddy.
1
2

mkdir ~/caddy ~/caddy/.data ~/caddy/configs ~/cloudflare
touch ~/caddy/Caddyfile ~/caddy/configs/cloudflare-tls ~/caddy/configs/cloudflare-clientip-map ~/caddy/cf.sh ~/caddy/reload.sh ~/caddy/caddy.yml
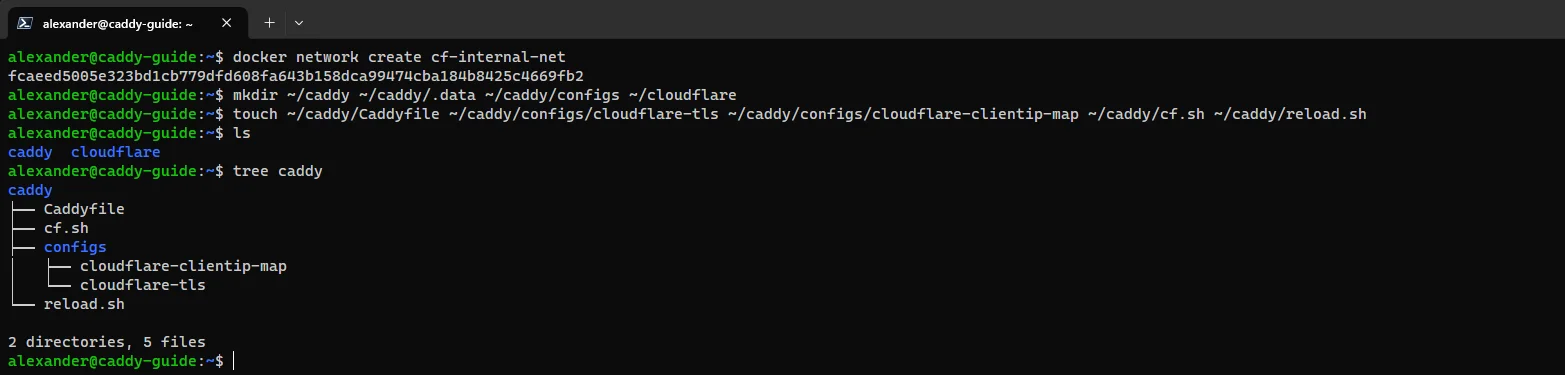 New Docker network and config directories
Change directory to the new Caddy directory we created above and edit the file called caddy.yml.
1
2
3

cd ~/caddy

nano caddy.yml
Next copy and paste the following into the new file.
1
2
3
4
5
6
7
8
9
10
11
12
13
14
15
16
17
18
19
20

version: '3'
services:
  server:
    restart: always
    networks:
      - cf
    image: alexandzors/caddy
    env_file: .env
    ports:
      - 80:80
      - 443:443
    volumes:
      - ${PWD}/Caddyfile:/etc/caddy/Caddyfile:ro
      - ${PWD}/.data:/data
      - ${PWD}/configs:/etc/caddy/configs:ro

networks:
  cf:
    name: cf-internal-net
    external: true
Hit CTRL + X then Y to save and close the file. This will be the compose file for deploying Caddy. Next do the same for both reload.sh and cf.sh
1
2
3
4
5
6
7
8
9
10
11
12
13
14
15
16
17
18
19
20
21
22
23
24
25
26
27
28
29

#!/bin/sh
# This script runs caddy reload, caddy validate, caddy fmt, and caddy version inside the container via docker exec.
# Usage:
# -r    caddy reload
# -v    caddy validate
# -f    caddy fmt
# -V    caddy version
# Caddy docs: https://caddyserver.com/docs/command-line
# Created by: https://github.com/alexandzors/caddy
# Created for: https://blog.alexsguardian.net/guides/#caddy
caddy_container_name="caddy-server-1"
caddy_container_id=$(docker ps | grep $caddy_container_name | awk '{print $1;}')

while getopts ":r:v:f:V" option; do
  case $option in
  r)
    docker exec -w /etc/caddy $caddy_container_id caddy reload
    ;;
  v)
    docker exec -w /etc/caddy $caddy_container_id caddy validate --config /etc/caddy/Caddyfile
    ;;
  f)
    docker exec -w /etc/caddy $caddy_container_id caddy fmt --config /etc/caddy/Caddyfile
    ;;
  V)
    docker exec -w /etc/caddy $caddy_container_id caddy version
    ;;
  esac
done
I have a new file I am working on that will eventually replace
reload.sh, but it’s still being tested. If you’d like this new file to help test, let me know!
1
2
3
4
5
6
7
8
9
10
11
12
13
14
15
16
17
18
19
20
21

#!/usr/bin/env sh
# This script queries cloudflare's website and pulls the list of IPv4 addresses. They are then loaded into a file to be used by Caddy.
# These IPs can be used for setting up trusted proxy configurations in web servers.
# Original file creator: https://caddy.community/t/trusted-proxies-with-cloudflare-my-solution/16124
# Updated by https://github.com/calvinhenderson to be more "succinct" as he put it. :)

FILE_IPV4="./configs/cloudflare-proxies"
tmp_file="/var/tmp/cloudflare-ips-v4-$(date +%Y%m%d_%H%M%S)"

# Make sure curl exists
command -v curl >/dev/null || { echo "Command 'curl' was not found. Is it in the PATH?"; exit 1; }

# Fetch the IP list from Cloudflare
curl -fso "$tmp_file" "https://www.cloudflare.com/ips-v4"
[ $? -eq 0 ] || { echo "Failed to fetch IPv4 list."; exit 1; }

# Transform the downloaded list into a format Caddy can understand
awk -v d=" " '{s=(NR==1?s:s d)$0}END{print "trusted_proxies "s}' "$tmp_file" > "$FILE_IPV4"

# Clean up
rm -f "$tmp_file"
After saving cf.sh edit your cron schedules and add the following schedule.
1

crontab -e
After selecting your editor for cron, add the following to the bottom of the schedules list. Make sure to update the path to the location of cf.sh.
1

@hourly bash /path/to/caddy/cf.sh
Then mark both scripts as executable.
1
2

chmod +x ./cf.sh
chmod +x ./reload.sh
Now run the cf.sh script to generate the cloudflare-proxies file in /configs/.
1

bash cf.sh
If successful you should be able to cat the file and get a list of IPs that match the ones listed here under the IPv4 section.
1
2
3

alexander@caddy-guide:~/caddy$ bash cf.sh
alexander@caddy-guide:~/caddy$ cat ./configs/cloudflare-proxies
trusted_proxies 173.245.48.0/20 103.21.244.0/22 103.22.200.0/22 103.31.4.0/22 141.101.64.0/18 108.162.192.0/18 190.93.240.0/20 188.114.96.0/20 197.234.240.0/22 198.41.128.0/17 162.158.0.0/15 104.16.0.0/13 104.24.0.0/14 172.64.0.0/13 131.0.72.0/22
Change directory into /caddy/configs and edit the following files with the provided information.
1
2

header_up X-Real-IP {http.request.header.CF-Connecting-IP}
header_up X-Forwarded-For {http.request.header.CF-Connecting-IP}
1
2
3

tls {
        dns cloudflare {env.CLOUDFLARETOKEN}
}
Obtaining a Cloudflare API Token
Next we need to generate an API token for Caddy to use for domain verification. The DNS Challenge utilizes a TXT record that is created by Caddy that Let’s Encrypt can then verify against. To generate this token head back to your Cloudflare Dashboard and click on the profile dropdown on the top right of the page, click “My Profile” then “API Tokens” from the left-hand menu.
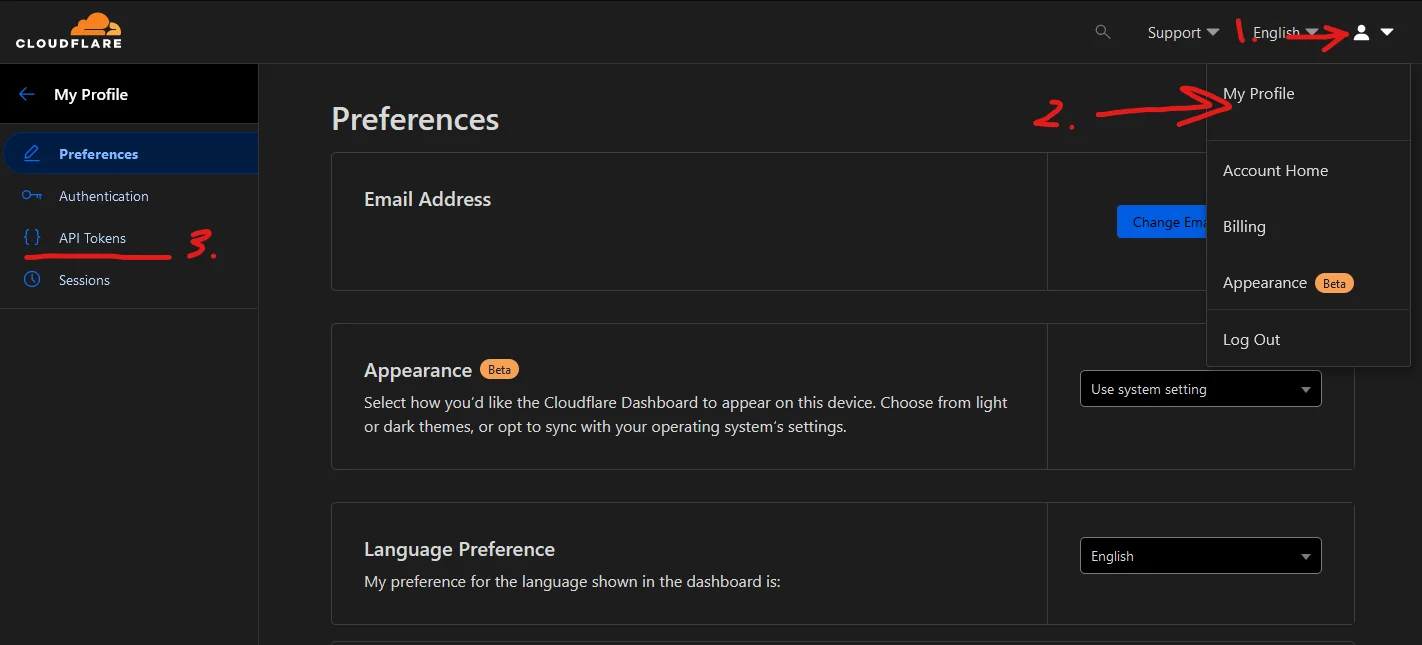 Navigating to the API Tokens page in Cloudflare
Click on the “Create Token” button in the API Tokens section. Then click on the “Use template” button for the “Edit zone DNS” option.
Do not use the Global API Key for Caddy!
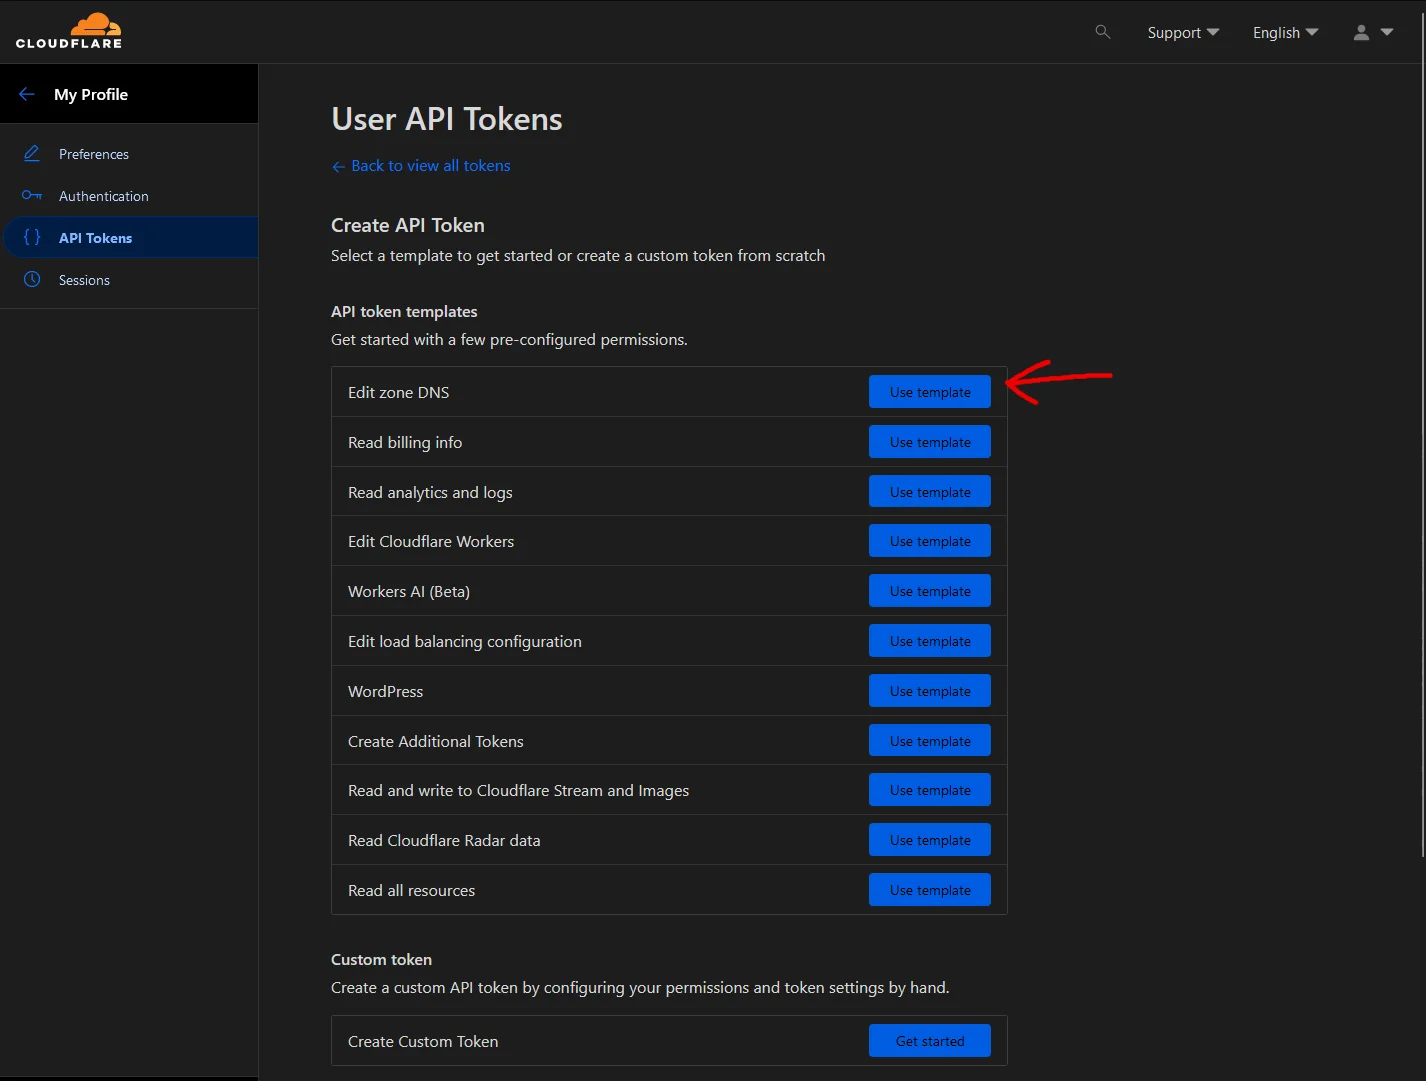 Cloudflare API template page
Give your token a recognizable name. Then in the Permissions section set the following options:
| Dropdown 1 | Dropdown 2 | Dropdown 3 |
|---|---|---|
| Zone | DNS | Read |
| Zone | DNS | Edit |
In the Zone Resources section:
| Dropdown 1 | Dropdown 2 | Dropdown 3 |
|---|---|---|
| Include | Specific Zone | universelab.net |
Your page should look similar to the image below.
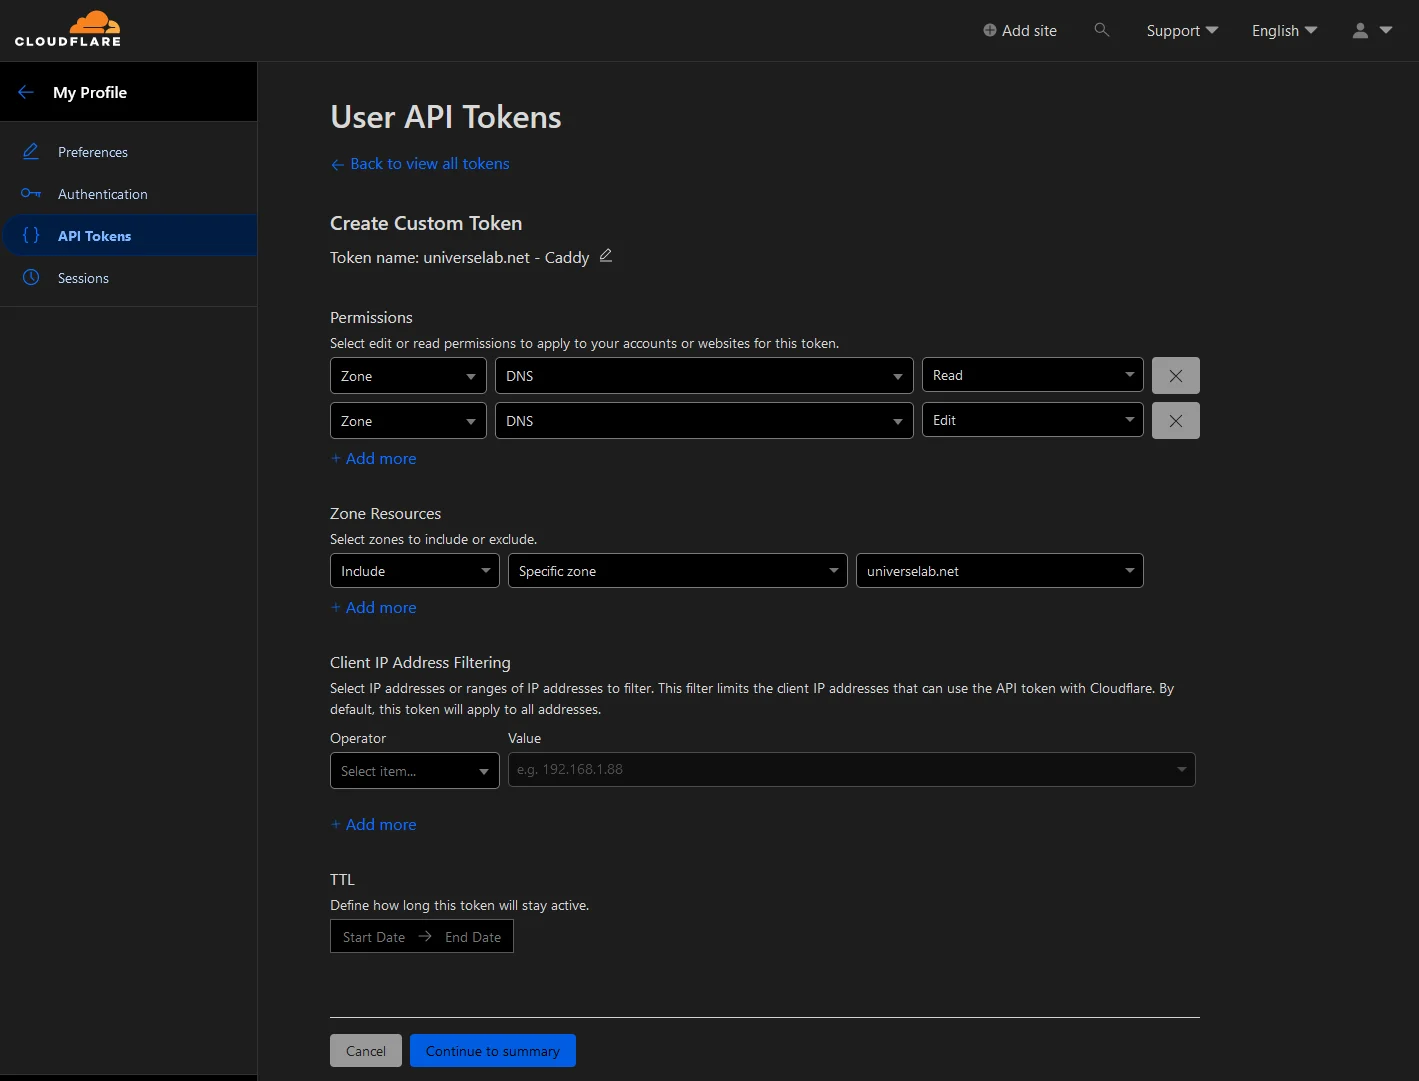 Cloudflare API Token Setup
Then click “Continue to summary”. Here you can verify your configuration for the token. Click “Create Token” to finish generating your API token. Copy it to a safe location as we will need it later.
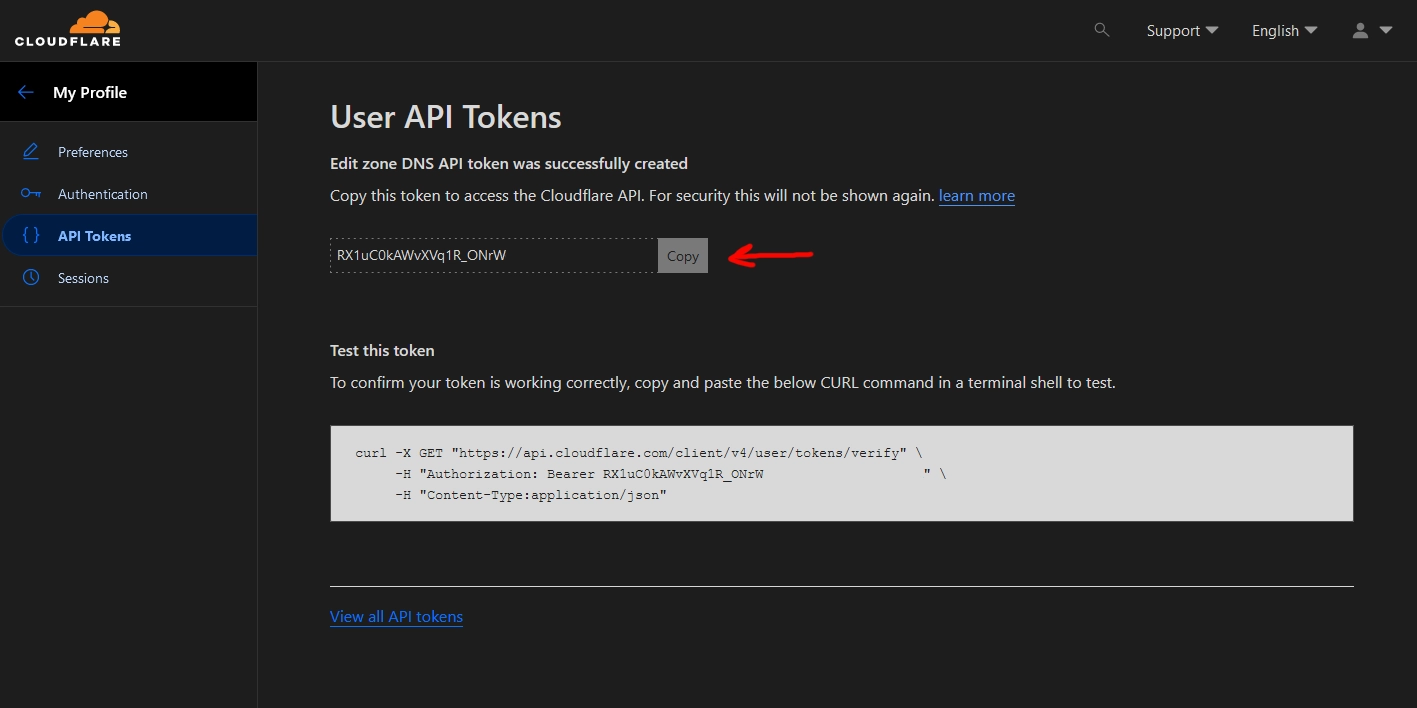 Cloudflare API Token
With the token in hand, jump back over to the host and in the /caddy directory create a new file called .env.
1

nano ~/caddy/.env
Add the following to the file.
1

CLOUDFLARETOKEN=RX1uC0kAWvXVq1R_ONrWxxxxxxxxxxxxxxxxxxxxxxxxx
Make sure to replace RX1uC0kAWvXVq1R_ONrWxxxxxxxxxxxxxxxxxxxxxxxxx with the token you generated above. Save and close the file with CTRL + x then y.
Preparing for Cloudflare Tunnel
With Caddy’s config prepped and ready to deploy we focus on prepping for Cloudflare Tunnel. This one will be easy as most of the config is done via Cloudflare’s Zero Trust dashboard. Though, we will still need a directory to house our docker compose config, and an env file for the tunnel on the host. Create a new directory called Cloudflare as well as the docker compose config file and the .env file.
1
2

mkdir ~/cloudflare
touch ~/cloudflare/cloudflare.yml ~/cloudflare/.env
Next edit the cloudflare.yml file and copy the following into it.
1
2

cd ~/cloudflare
nano cloudflare.yml
1
2
3
4
5
6
7
8
9
10
11
12
13
14

version: '3'
services:
 tunnel:
    restart: always
    networks:
      - cf
    image: cloudflare/cloudflared:latest
    command: 'tunnel -no-autoupdate run --token ${TOKEN}'
    env_file: .env

networks:
  cf:
    name: cf-internal-net
    external: true
Save and close the file with CTRL + x then y. We will come back to the .env file later.
Configuring and Deploying Cloudflare Tunnel
Now that we have the host prepared and Cloudflare configured, we can start setting up the tunnel. To get the tunnel up we need to navigate to the Zero Trust Dashboard in Cloudflare. Jump back to the main Cloudflare dashboard and then click on “Zero Trust” in the menu on the left.
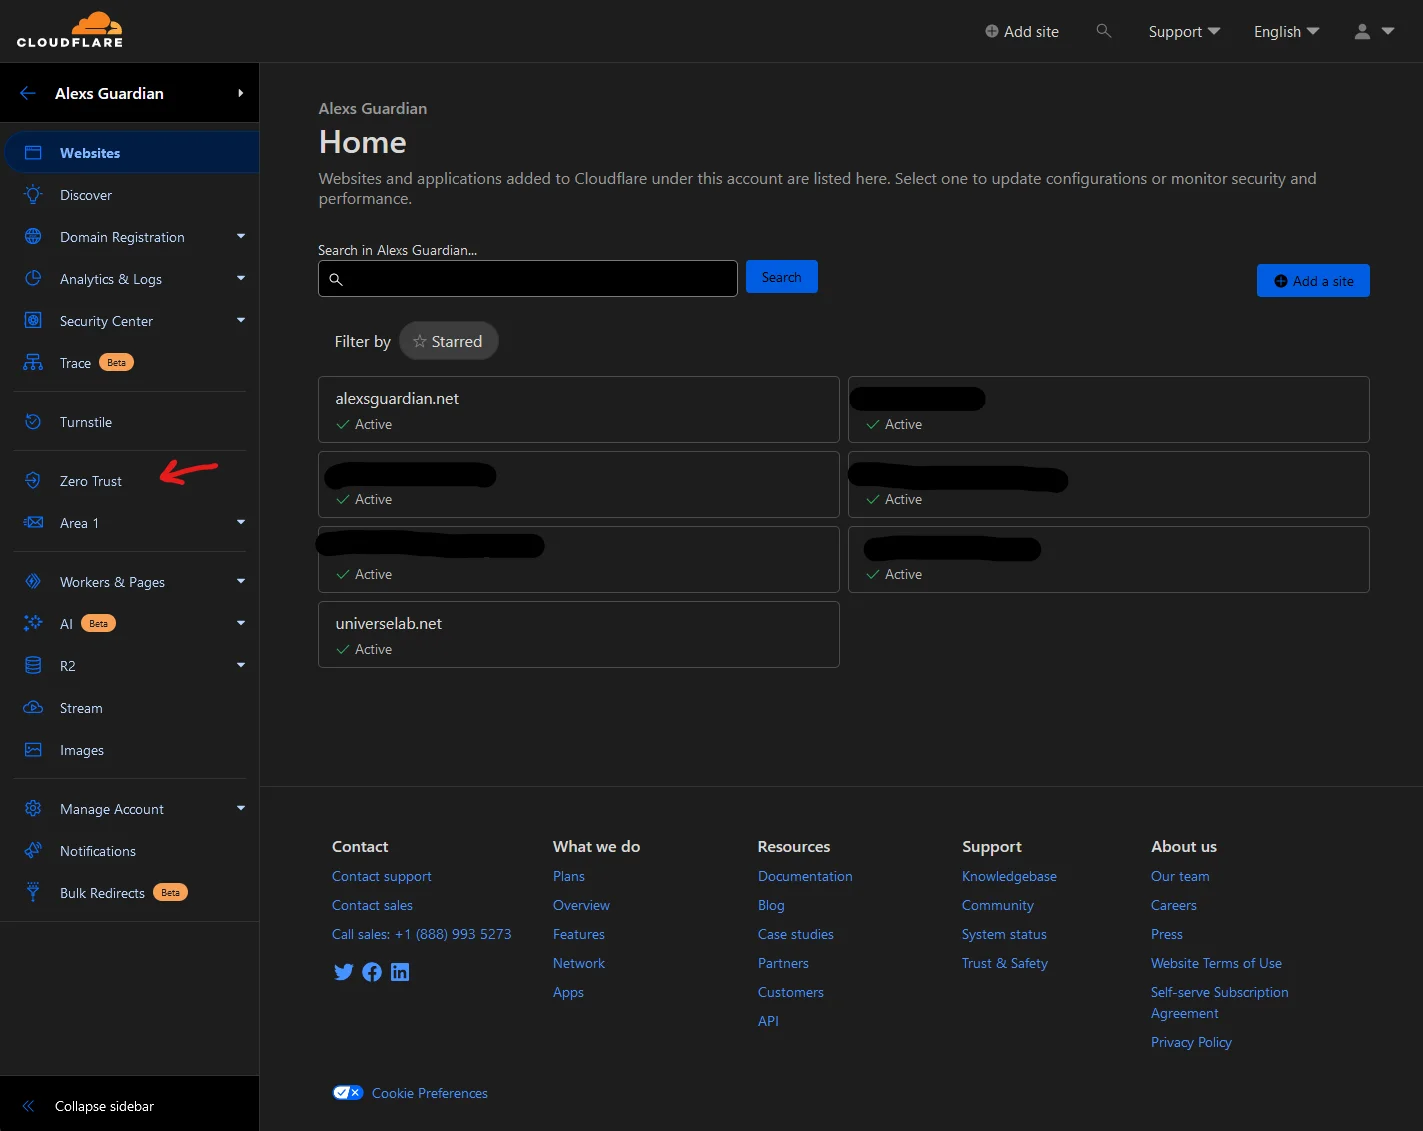 Cloudflare Zero Trust menu option
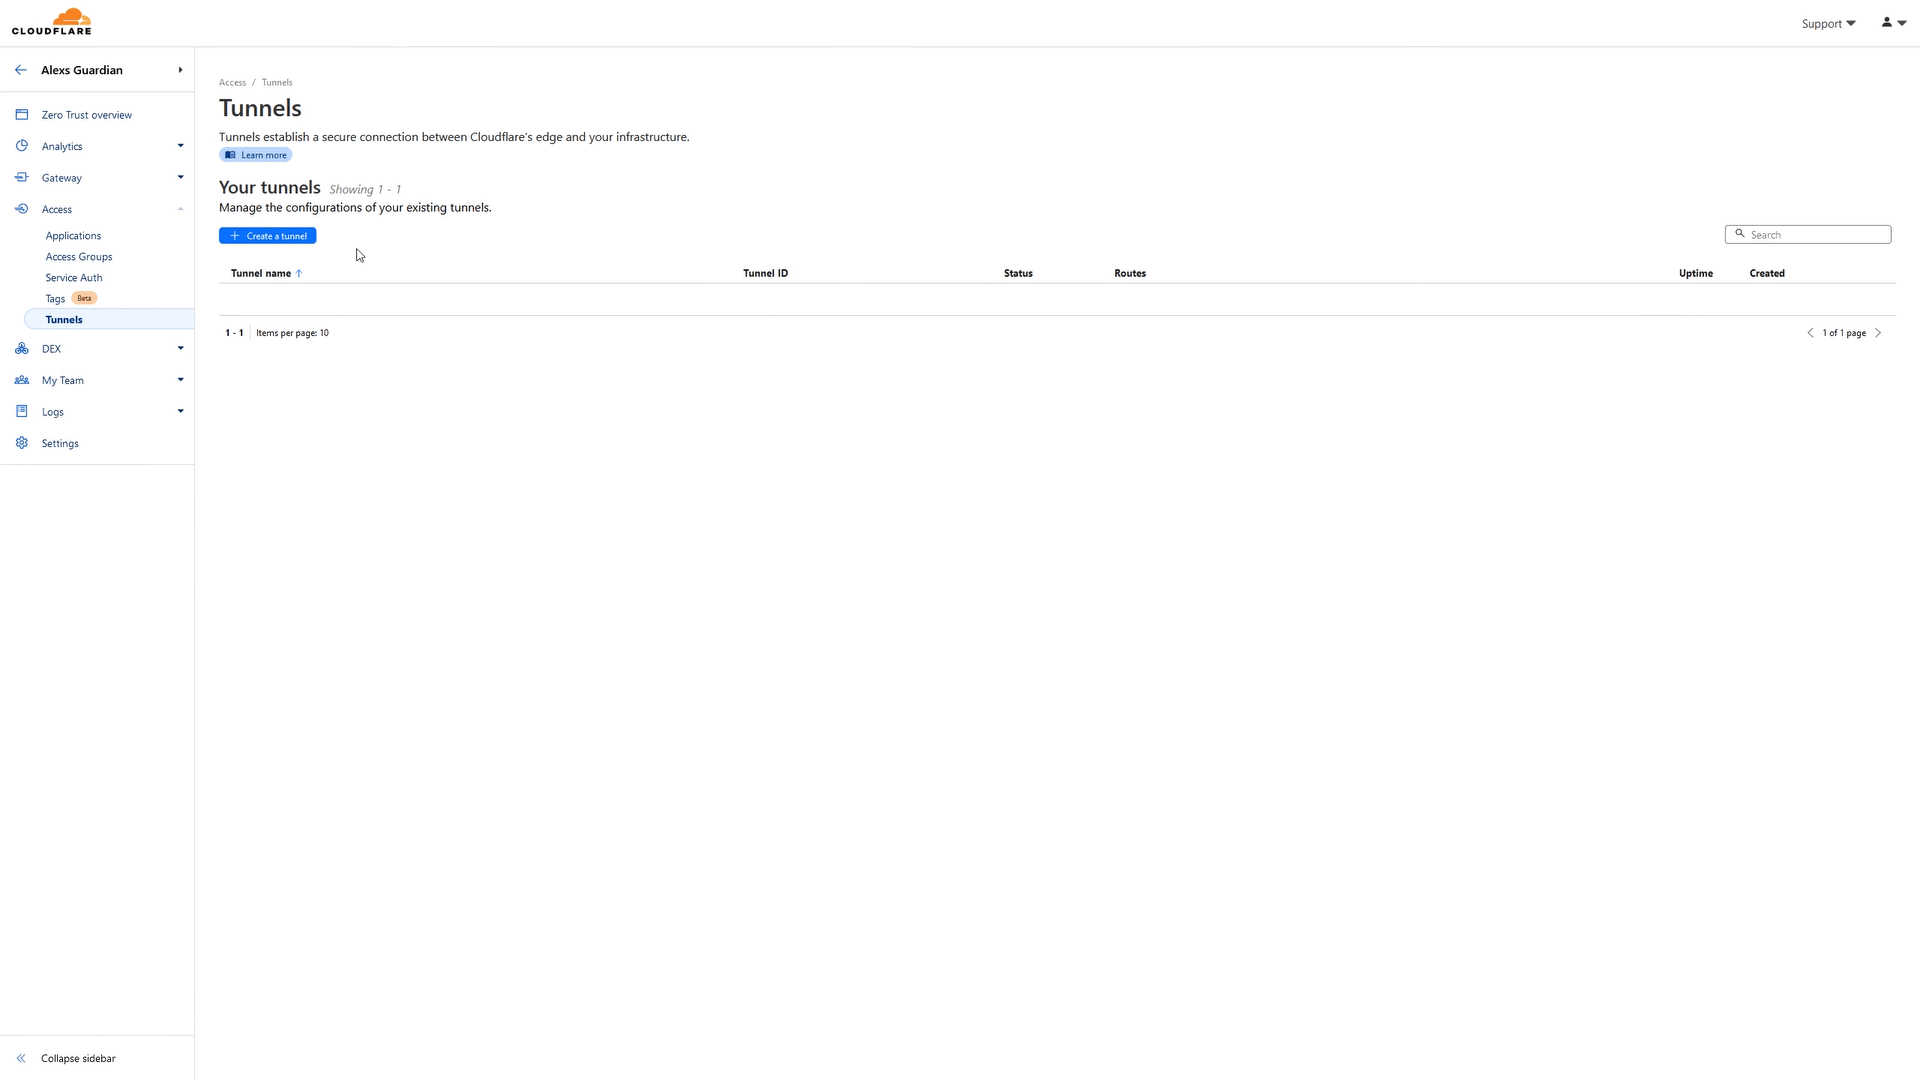
Once on the Zero Trust dashboard, select the Access > Tunnels option.
Sorry dark mode users the Zero Trust dash does not have dark mode :(
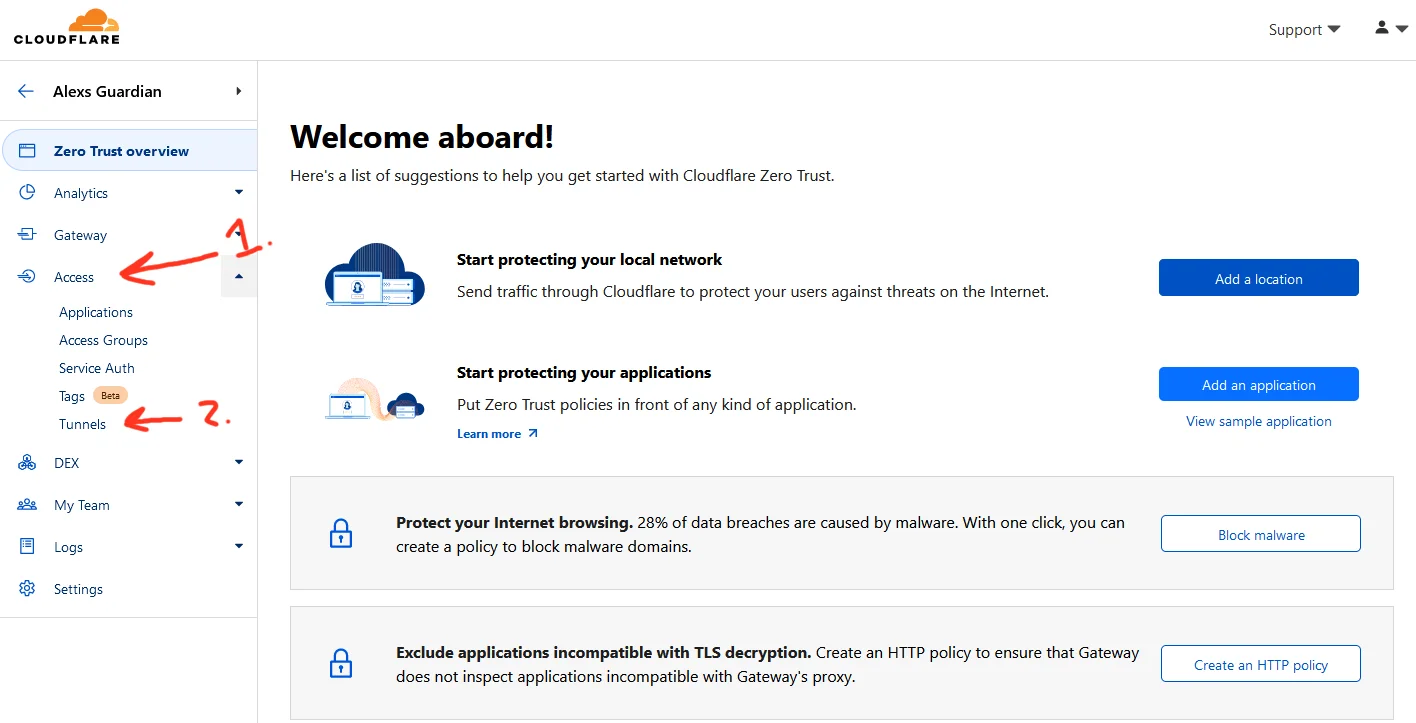 Cloudflare Tunnels menu option
Now click on the “+ Create a tunnel” button on the Tunnels overview page.
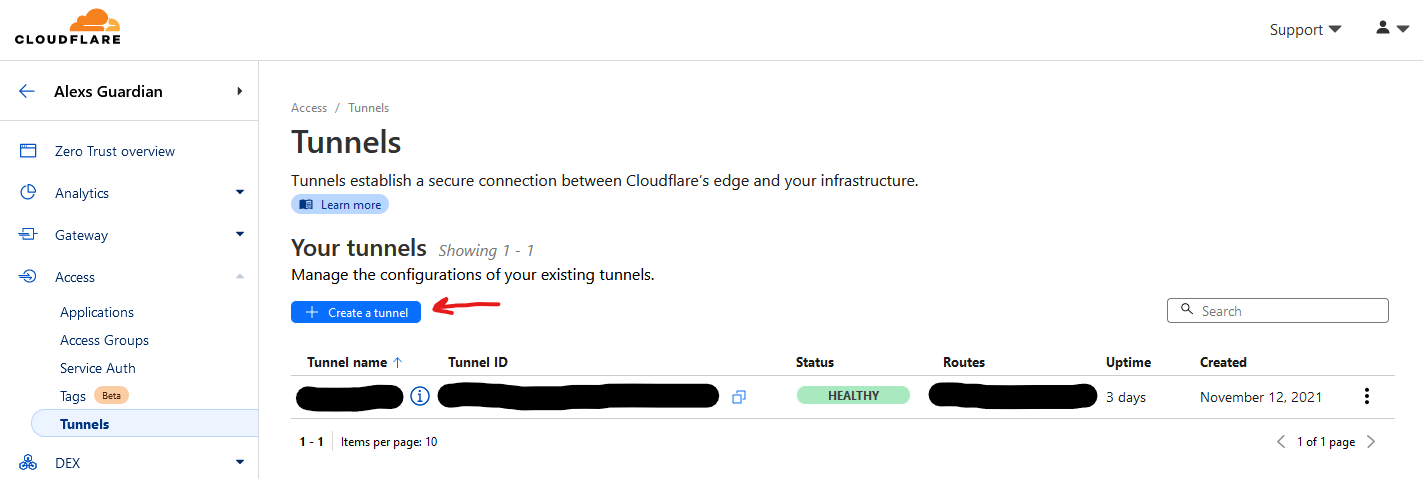 Cloudflare Tunnels Overview
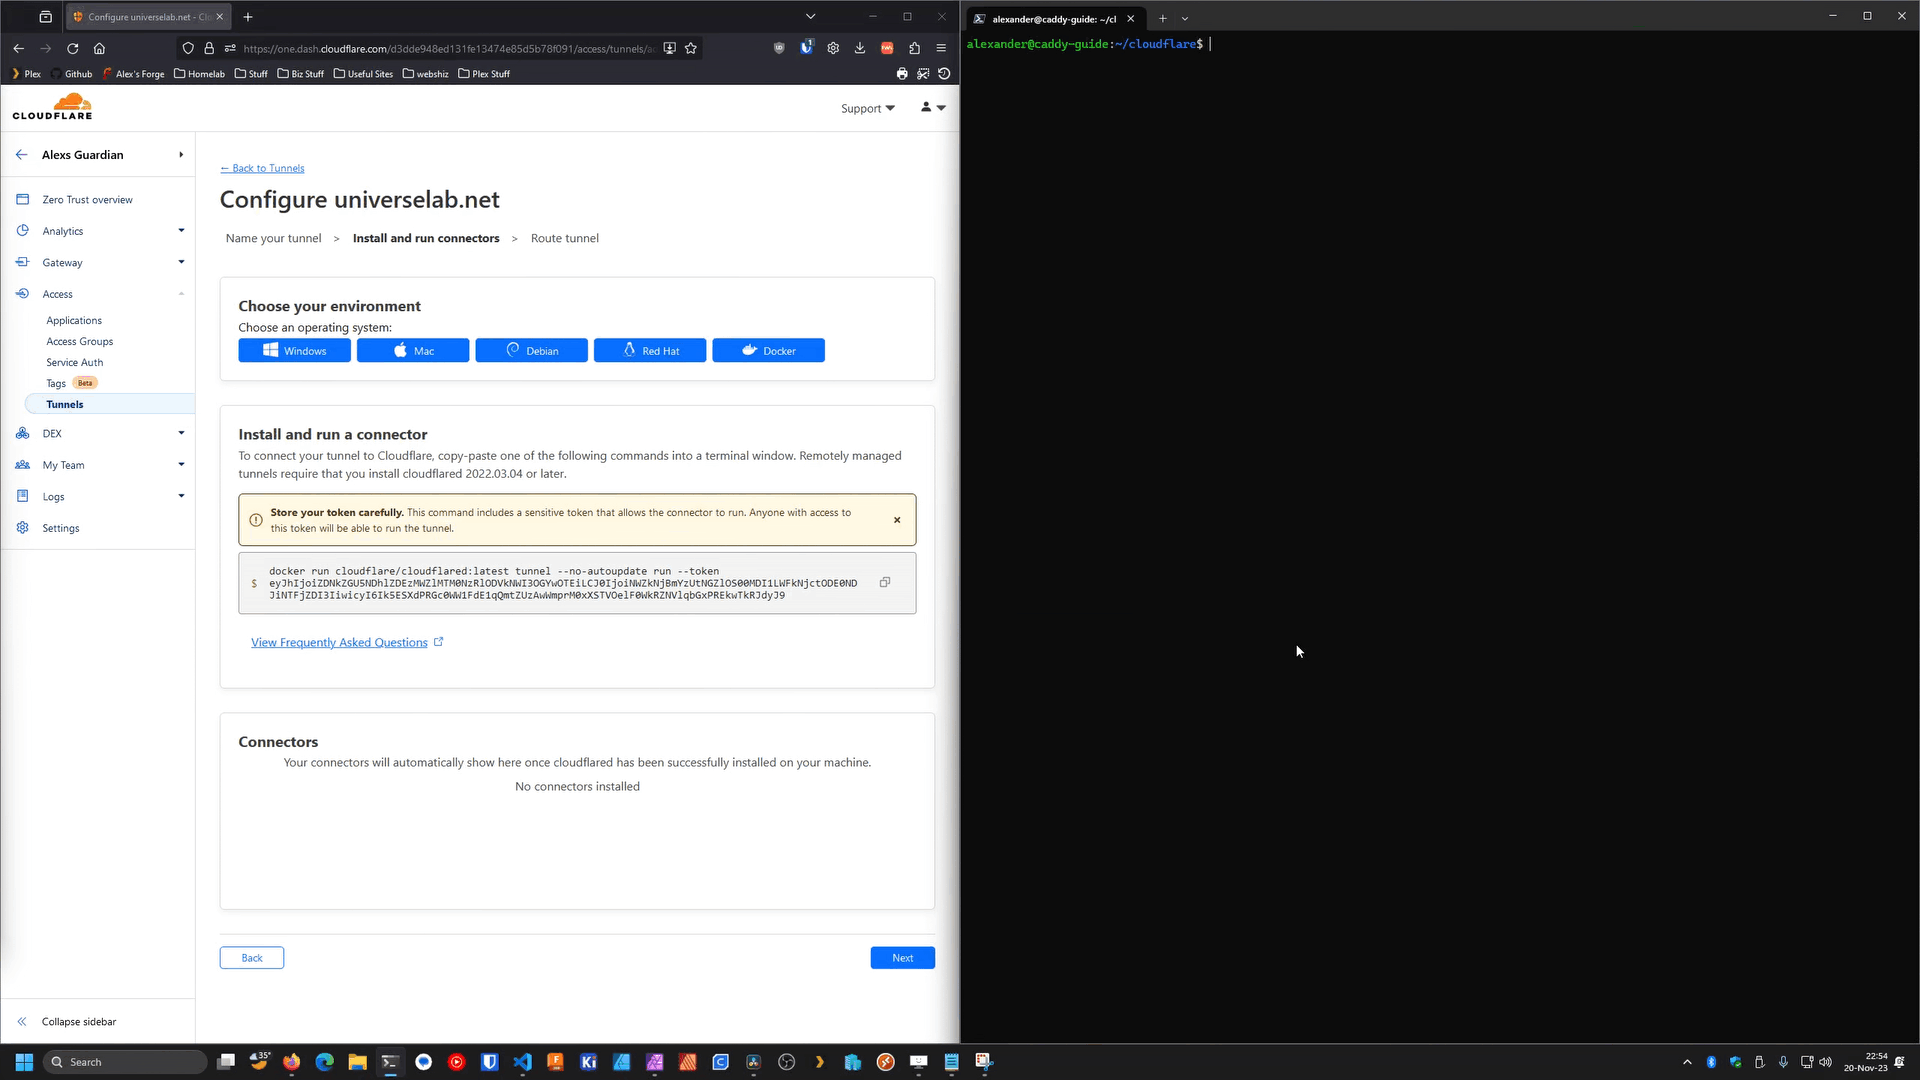
Follow the wizard to create the tunnel. Give it a name and copy the Docker run command on the next page.
 First Part of the Tunnel Creation Wizard
Take the command and paste it into notepad. Delete everything but the token and then copy the token.
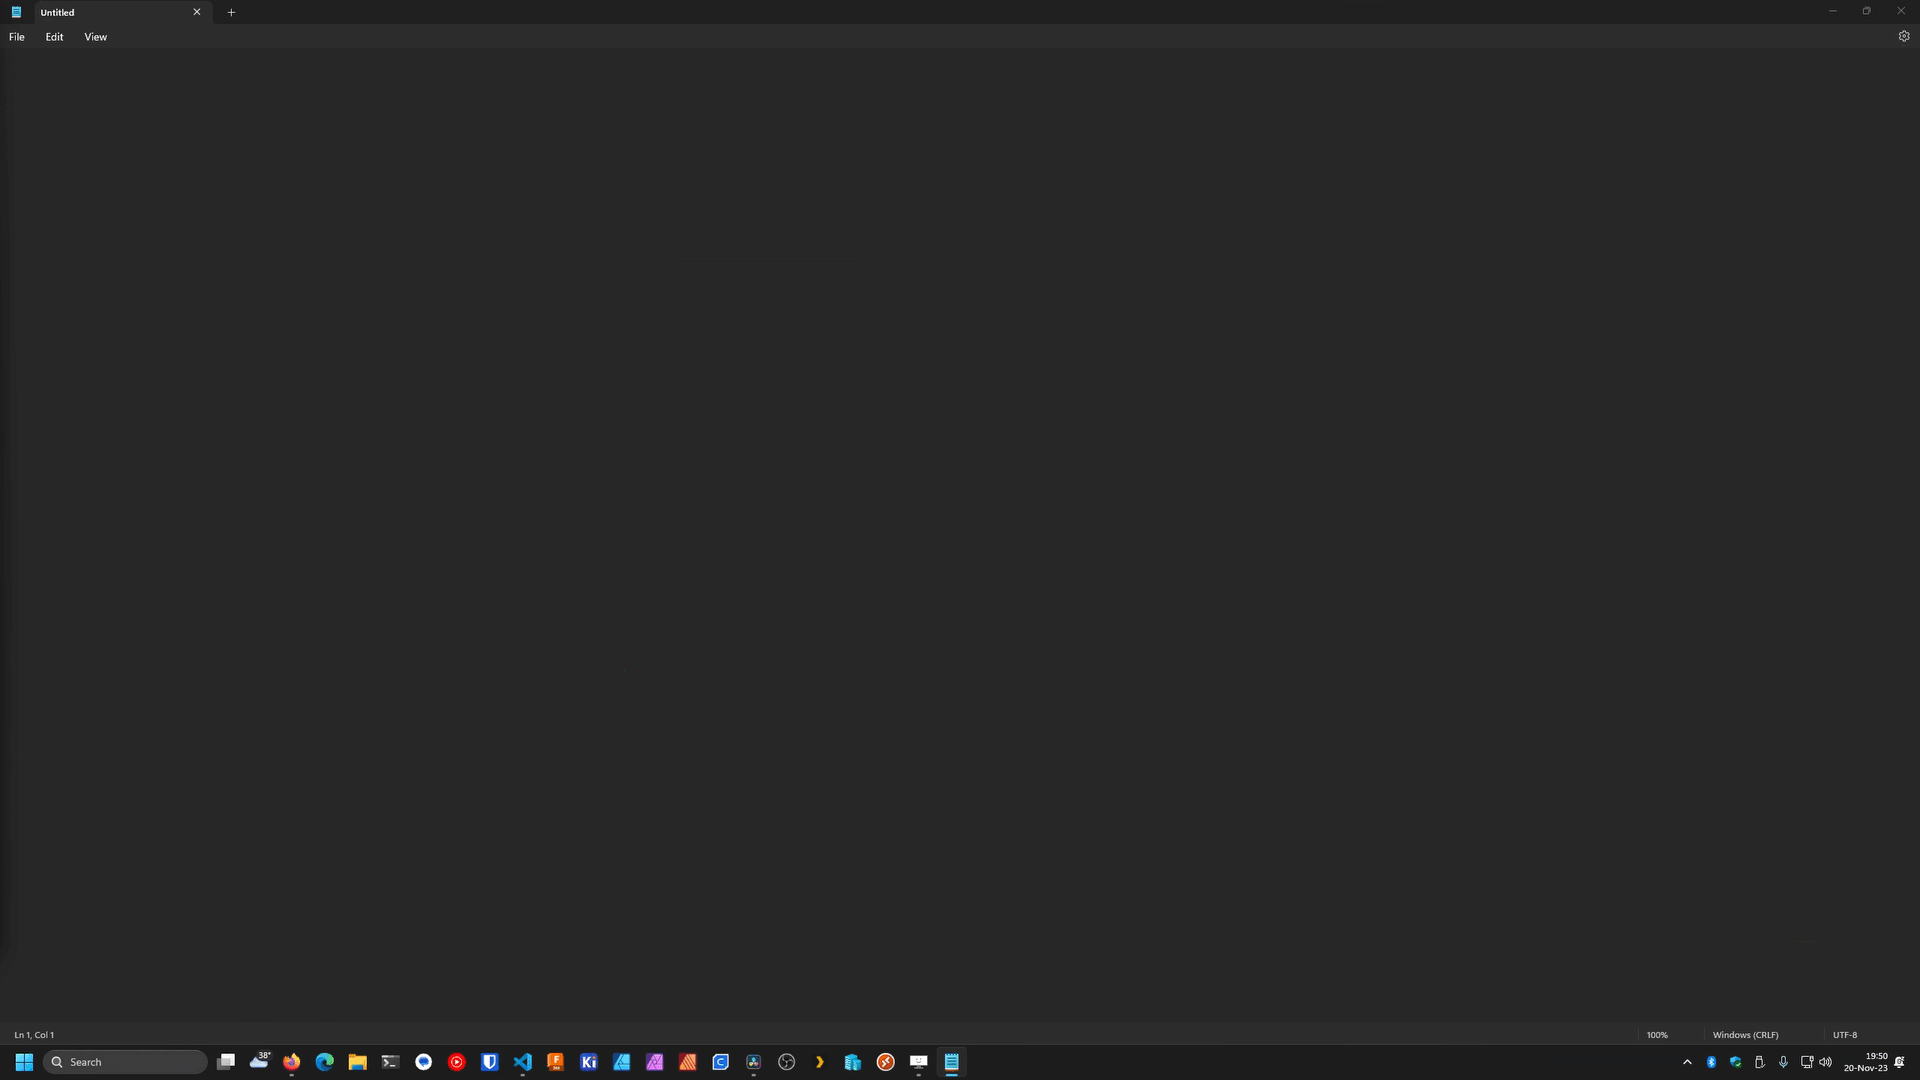 Editing the Docker Run Command for the Tunnel
Now return to your host and edit the .env file in the /cloudflare directory. Copy the following into the file. Replace my demo token with the one you copied earlier.
1

TOKEN=eyJhIjoiZDNkZGU5NDhlZDEzMWZlMTM0NzRlODVkNWI3OGYwOTEiLCJ0IjoiMTVlZGY1ZTUtNDE1YS00YWFmLTg0NzQtN2VkNDhiNTU2OThjIiwicyI6Ik1qTmtNek0wTkRBdFpHSTROaTAwT1RrMUxXRTBaREV0WmpVek1Ea3pNakEzTm1aaSJ9
Save and close the file. Your /cloudflare directory should look like the following image after you are done.
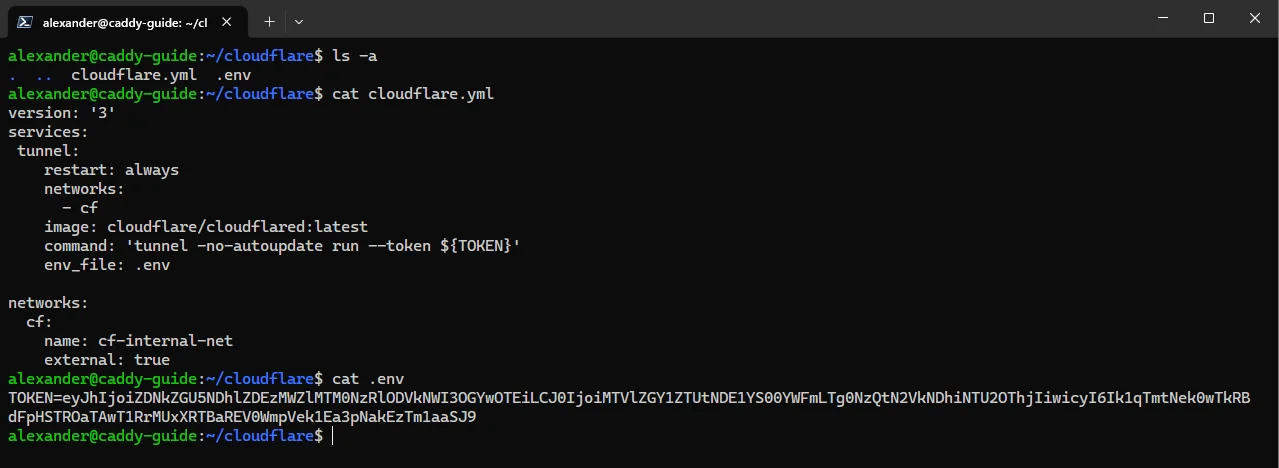 Example Cloudflare Tunnel Config
In the /cloudflare directory run docker compose -f cloudflare.yml up. If you watch the Tunnel Wizard you can see the local tunnel connect to Cloudflare in the lower box labeled “Connectors.”
 Local Tunnel Connecting to Cloudflare
Once the tunnel is connected. Hit CTRL + C to terminate the Cloudflare container. Then re-run docker compose -f cloudflare.yml up -d. The -d argument runs the container in ‘detach mode’ so that it can run in the background. By running docker ps you can verify if it is up and running.
1
2
3

alexander@caddy-guide:~/cloudflare$ docker ps
CONTAINER ID   IMAGE                           COMMAND                  CREATED         STATUS         PORTS     NAMES
e9e03f600a69   cloudflare/cloudflared:latest   "cloudflared --no-au…"   9 minutes ago   Up 2 seconds             cloudflare-tunnel-1
Return to the Zero Trust dashboard and continue to the “Route tunnel” step in the Tunnel wizard. Under the “Public Hostnames” tab select your domain in the “Domain” drop-down. Then select HTTPS for the service “Type” and enter caddy-server-1:443 for the service “URL.”
If you change the service name for Caddy in the
caddy.ymlfile, or you are using a directory that’s not named “caddy”, you will need to update this URL to match. Reference: caddy = The directory the compose file is in, server = service name in caddy.yml compose file, 1 = replication identifier.
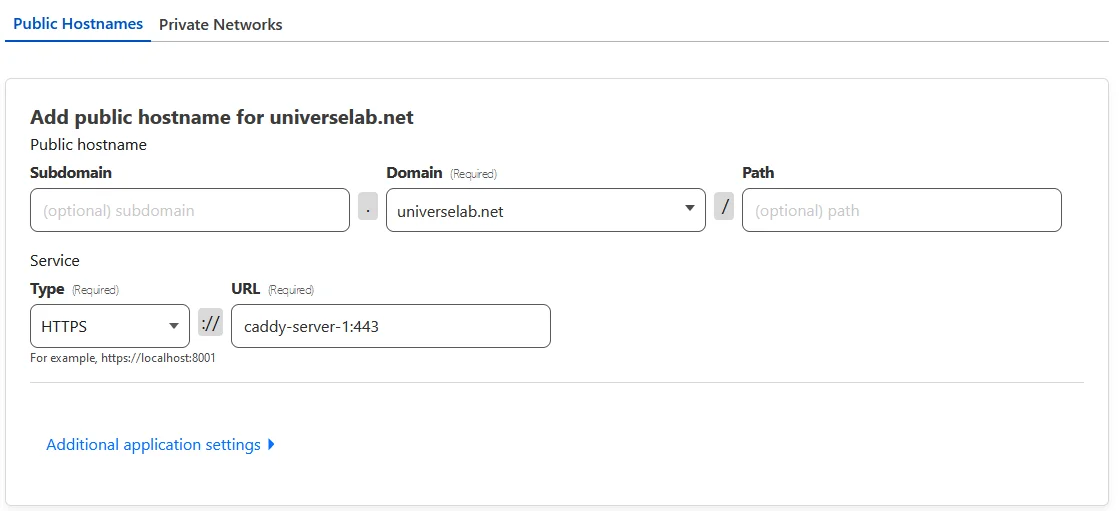 Route tunnel example
Under the “Additional application settings”, select TLS and then input your domain name into the “Origin Server Name” field.
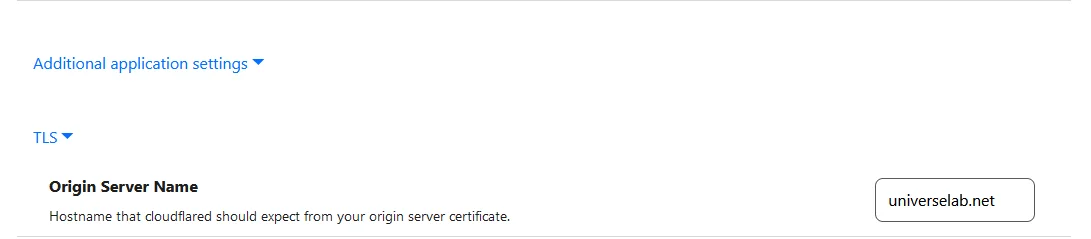 Tunnel SNI config
You can then save the tunnel configuration. We can come back later to add more routes, once we get everything set up and working with the root domain.
 Online and Connected Tunnel
If you return to the main dashboard, select your domain and go to DNS > Records. You can see the entry added for the root domain pointing to the tunnel.
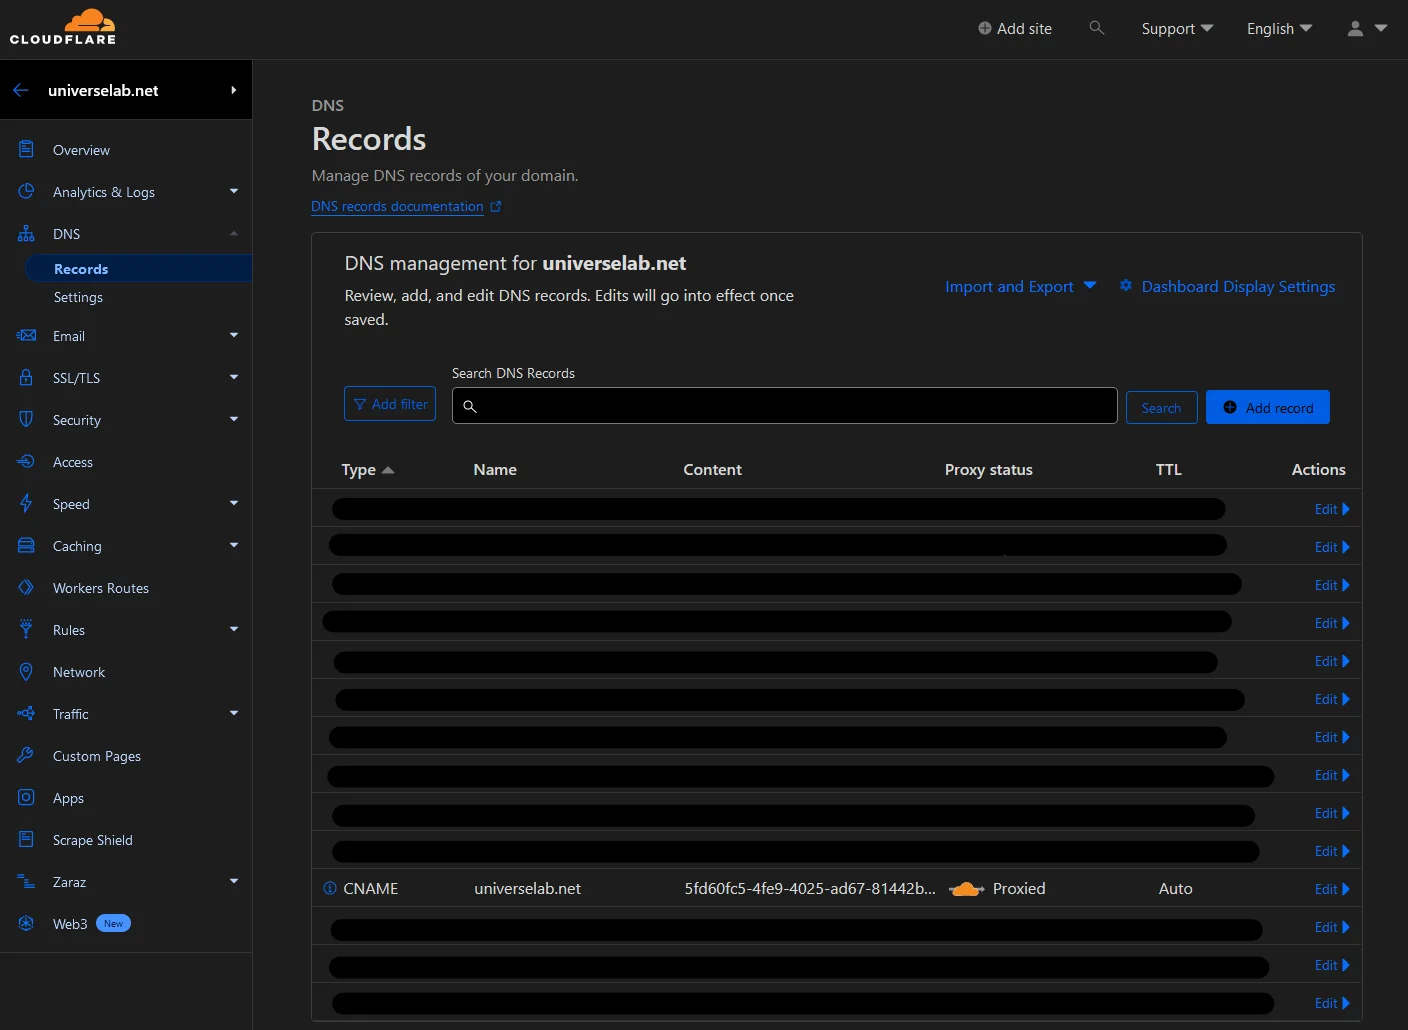 Tunnel entry in DNS records
Configuring X-Forwarded-For Header Security
I’m not going to dwell on the details here, but this is highly recommended. Especially if you plan on using stuff like Authelia in your setup. The Authelia docs9 have a great write-up on why this is necessary. The quick definition is that you want the X-Forwarded-* headers sent to Authelia/other auth providers to be from trusted sources. Cloudflare automatically adds the X-Forwarded-For header if it does not exist, and if it does then it just appends an IP to it. So technically a client could forge their IP via the X-Forwarded-For header and gain access to trusted services behind your auth provider. Very easy if you use IP based auth handling. I was going to do this in part 2 but since we are already in the dashboard we might as well knock this out too.
Follow the guide at the bottom of the docs to set up a transform rule to remove the X-Forwarded-For header in requests from Cloudflare. Note that the Cloudflare dashboard UI changed slightly since their guide was created. All the options still exist, they just look slightly different from the images.
 Example Transform Rule
Configuring Cloudflare SSL/TLS Encryption
With our tunnel running now, we need to do one more thing in Cloudflare before we can deploy Caddy. Navigate back to the main Cloudflare dashboard and click on your domain on the homepage. In the domain settings, click on SSL/TLS in the left menu. Then set the SSL/TLS encryption mode to “Full (strict)”.
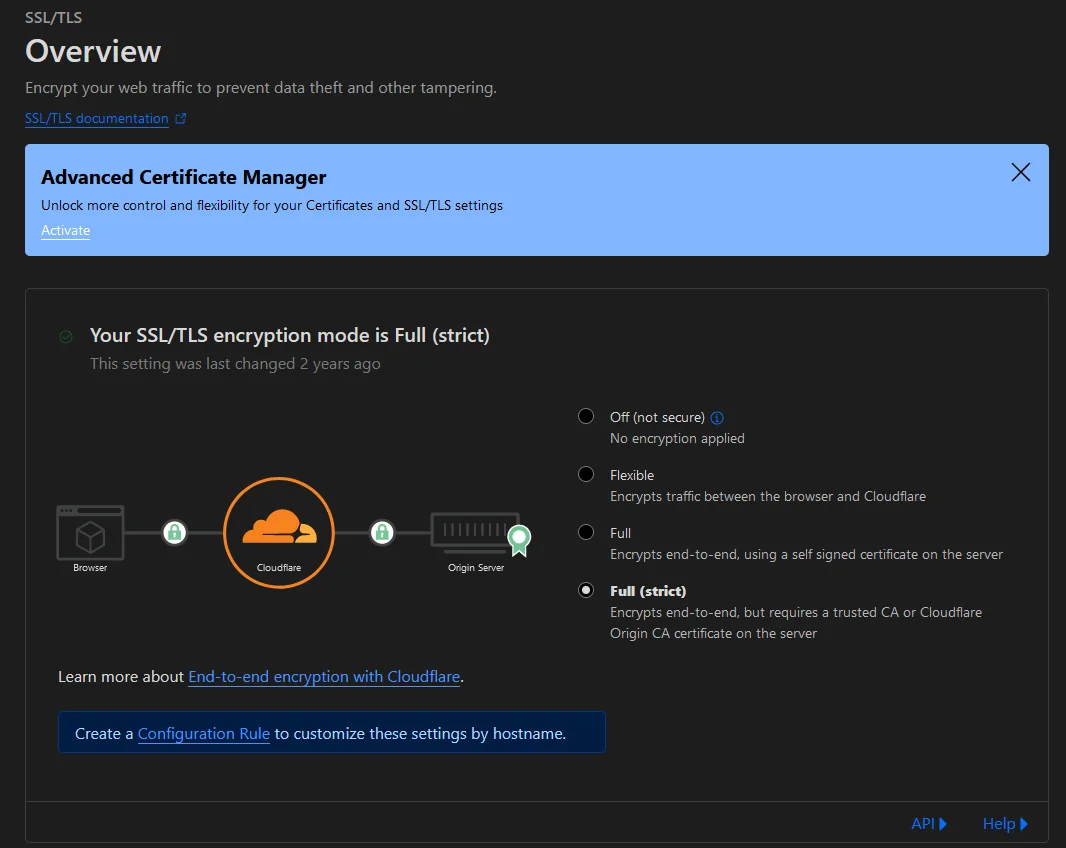 Cloudflare SSL/TLS Setting
This setting is necessary since we will be using HTTPS all the way through to Caddy, but Caddy will be managing its own certificates from Let’s Encrypt rather than using the Cloudflare one.
Configuring and Deploying Caddy
Head back over to your host and navigate to the /caddy directory. Since we already set up the extra config files earlier we just need to configure our Caddyfile now. Edit your Caddyfile and add the following to it.
1
2

cd ~/caddy
nano Caddyfile
1
2
3
4
5
6
7
8
9
10
11
12
13
14
15
16
17
18
19
20
21
22
23
24
25
26

# Global Config
{
	email certs@universelab.net
	default_sni universelab.net
	# acme_ca https://acme-v02.api.letsencrypt.org/directory
	admin localhost:2019
	# debug
	acme_ca https://acme-staging-v02.api.letsencrypt.org/directory
}

# Global Reusable Blocks
(trusted_proxies) {
	import ./configs/cloudflare-proxies
}
(tls) {
	import ./configs/cloudflare-tls
}
(cf-client-ip) {
	import ./configs/cloudflare-clientip-map
}

# Web Config
universelab.net {
  import tls
  respond "I'm Alive!"
}
Make sure to edit the following lines:
- Line 2: Change this email to yours for cert issue emails. This email is reported to Let’s Encrypt
- Line 3: Change this to your root domain name. e.g.
universelab.net1011 - Line 22: Change this to your root domain.
Caddyfile breakdown:
- Line 6 specifies the endpoint for the Admin API.
- Line 7 uncommented, with a Caddy reload, will enable debug logging.
- Line 8 is currently uncommented. This is so we can verify Caddy can pull a certificate without getting rate limited by the production server.
- Once it’s verified working this can be commented out and then Line 5 can be uncommented. After a soft reload (
bash ~/caddy/reload.sh -r) Caddy will pull production certificates.
- Once it’s verified working this can be commented out and then Line 5 can be uncommented. After a soft reload (
- Lines 12–20 load our files in
/configsinto reusable blocks. - Line 24 imports the reusable TLS block
- Line 25,
respond "I'm Alive", will load a blank page with just “I’m Alive” on it. This will let us know that Caddy is up and running.
You can find more global configuration options in Caddy’s docs, here. Once you are done editing the Caddyfile, save and close the file. Next deploy Caddy.
1

docker compose -f caddy.yml up
Now watch the Caddy container log.
 Deploying Caddy with staging acme server
1
2
3
4
5
6
7
8

caddy-server-1  | {"level":"info","ts":1701043244.409581,"logger":"tls.issuance.acme","msg":"waiting on internal rate limiter","identifiers":["universelab.net"],"ca":"https://acme-staging-v02.api.letsencrypt.org/directory","account":"[email protected]"}
caddy-server-1  | {"level":"info","ts":1701043244.4096115,"logger":"tls.issuance.acme","msg":"done waiting on internal rate limiter","identifiers":["universelab.net"],"ca":"https://acme-staging-v02.api.letsencrypt.org/directory","account":"[email protected]"}
caddy-server-1  | {"level":"info","ts":1701043244.5805037,"logger":"tls.issuance.acme.acme_client","msg":"trying to solve challenge","identifier":"universelab.net","challenge_type":"dns-01","ca":"https://acme-staging-v02.api.letsencrypt.org/directory"}
caddy-server-1  | {"level":"info","ts":1701043248.1329238,"logger":"tls.issuance.acme.acme_client","msg":"authorization finalized","identifier":"universelab.net","authz_status":"valid"}
caddy-server-1  | {"level":"info","ts":1701043248.1329548,"logger":"tls.issuance.acme.acme_client","msg":"validations succeeded; finalizing order","order":"https://acme-staging-v02.api.letsencrypt.org/acme/order/126833864/12560144614"}
caddy-server-1  | {"level":"info","ts":1701043251.419936,"logger":"tls.issuance.acme.acme_client","msg":"successfully downloaded available certificate chains","count":2,"first_url":"https://acme-staging-v02.api.letsencrypt.org/acme/cert/faa951a05bba0ad74c64fb93b075facfb504"}
caddy-server-1  | {"level":"info","ts":1701043251.4202852,"logger":"tls.obtain","msg":"certificate obtained successfully","identifier":"universelab.net"}
caddy-server-1  | {"level":"info","ts":1701043251.420341,"logger":"tls.obtain","msg":"releasing lock","identifier":"universelab.net"}
Notice on lines 7-8 where Caddy reported back that it obtained the certificate and released the lock. This means it was able to query Let’s Encrypt and Cloudflare using the DNS acme challenge to verify the domain and generate a certificate. Hit CTRL + C to terminate the currently running Caddy container. Then edit the Caddyfile again and comment out line 7 and uncomment line 4. This will switch the acme server from the staging one to production. Your Caddyfile should now look like this one:
1
2
3
4
5
6
7
8
9
10
11
12
13
14
15
16
17
18
19
20
21
22
23
24
25
26

# Global Config
{
	email certs@universelab.net
	default_sni universelab.net
	acme_ca https://acme-v02.api.letsencrypt.org/directory
	admin localhost:2019
	# debug
	# acme_ca https://acme-staging-v02.api.letsencrypt.org/directory
}

# Global Reusable Blocks
(trusted_proxies) {
	import ./configs/cloudflare-proxies
}
(tls) {
	import ./configs/cloudflare-tls
}
(cf-client-ip) {
	import ./configs/cloudflare-clientip-map
}

# Web Config
universelab.net {
  import tls
  respond "I'm Alive!"
}
Re-deploy Caddy using docker compose -f caddy.yml up. Watch the logs again for the same message as before though, this time we are pulling production certificates. Once you see that message. Open a browser window and navigate to your domain. If everything is working you should see the “I’m Alive!” text in the browser.
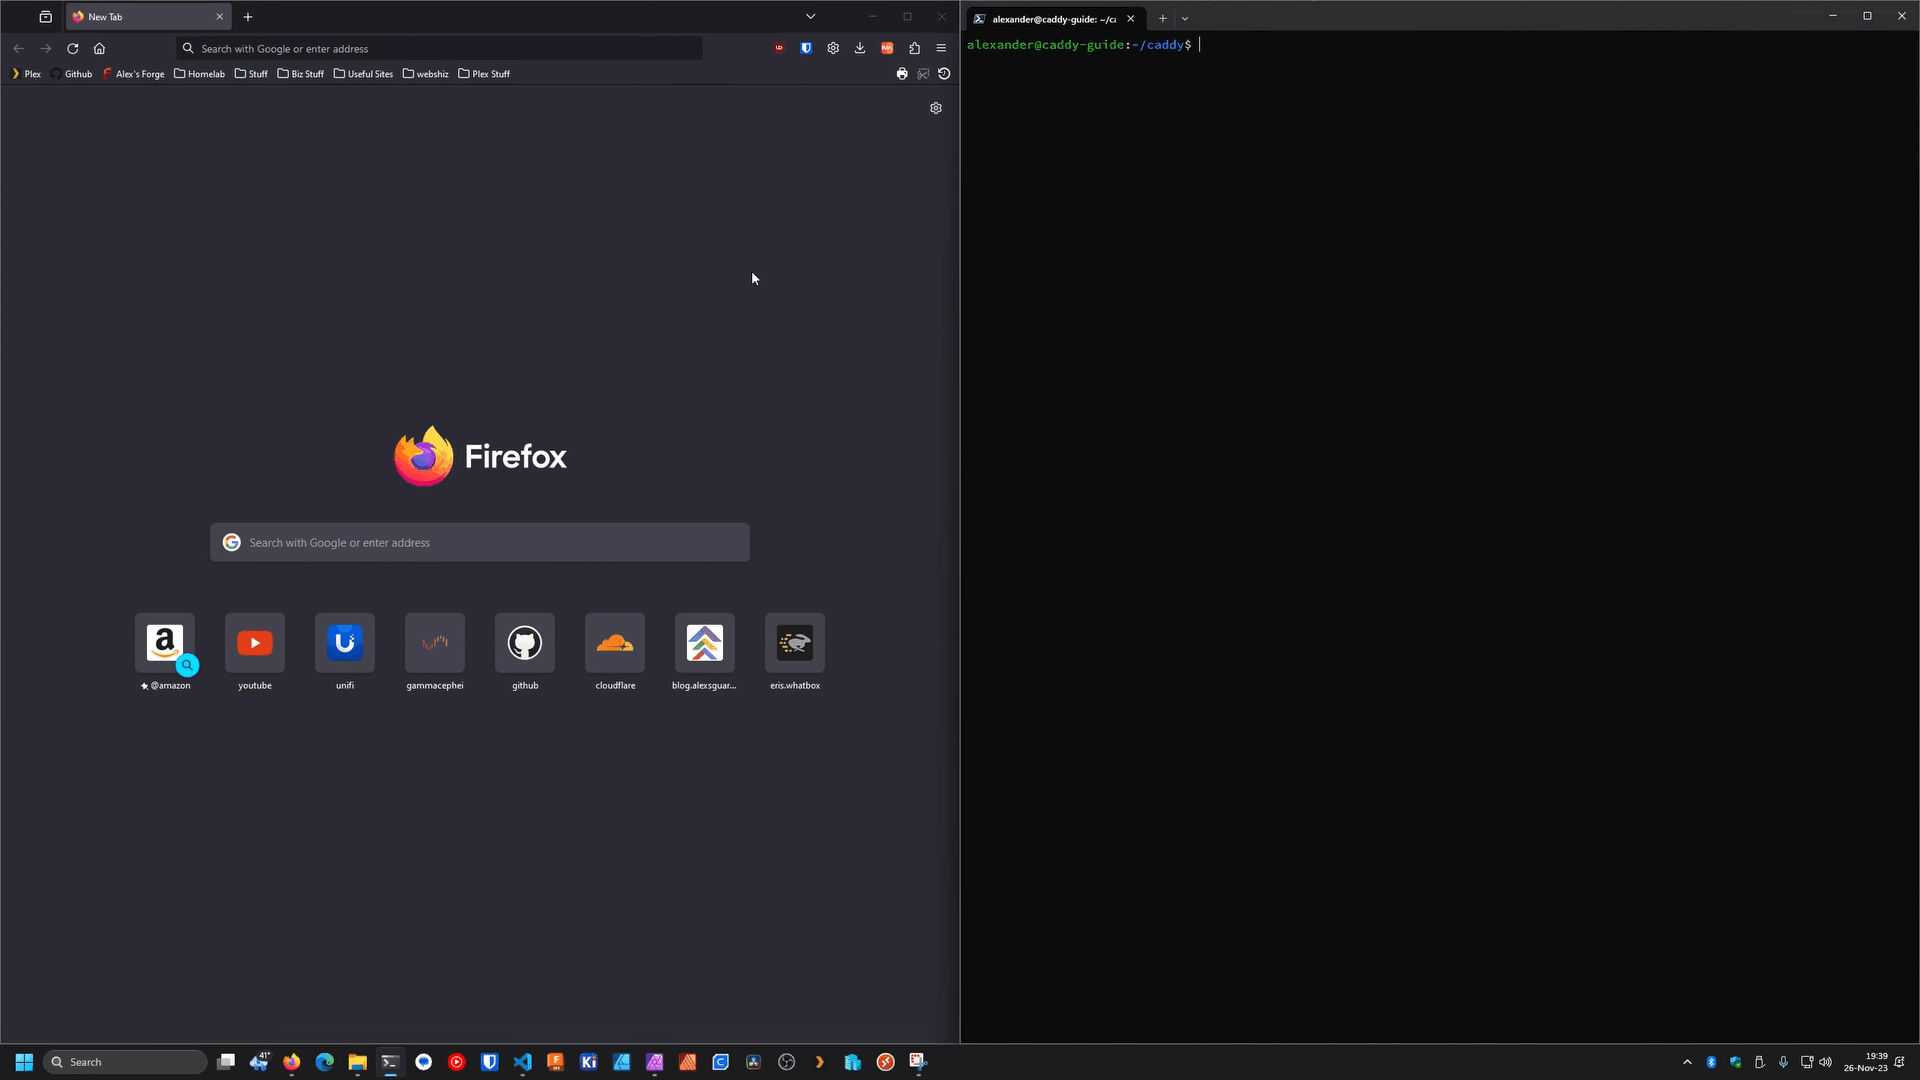 I’m Alive!
Basic Troubleshooting FAQ
Q: I got an origin error page from Cloudflare. Code 502: Bad Gateway
If you get a 502 origin error Cloudflare page, double-check your public hostname settings in the Zero Trust dashboard for the tunnel. Check the following:
- Make sure the Origin Server Name under the additional settings > TLS matches the
default_snivalue in your Caddyfile - Make sure the service URL is matches the name of your Caddy container when you run
docker ps - Make sure Caddy and Cloudflare are on the same docker network.
docker network inspect cf-internal-net
Q: I got an “Error 1033: Argo Tunnel error” Cloudflare error page
Make sure the Cloudflare Tunnel container is running on your host. If it is running, double-check your DNS > Records for the domain to verify that the root domain is pointing to the correct Tunnel ID.
Q: Caddy fails to obtain certificates from staging
Check the following:
- Make sure the
CLOUDFLARETOKENenvironment variable for Caddy matches the API key you generated in your Cloudflare Account. - Make sure the API key has both read and edit permissions for the domain you are trying to use.
- Sometimes you need to wait a bit for DNS to propagate before trying to obtain certificates.
Conclusion
Deploying and maintaining a web server / reverse proxy in your lab environment can be complicated. However, it can also be a good teaching ground for learning how websites and services get served over the internet. There are risks that need to be considered when doing this, and you should always ask yourself when deploying something new: “Does this service need to be publicly accessible or can I just use a VPN to my network?”.
If you run into any trouble throughout this guide series please reach out via a comment or shoot me an email! Stay tuned for part 2!
Edit: I’ll eventually get to the part 2 portion of this guide but for now you can see an excellent write-up by Matthew F. on the Caddy community forums.
My dumb brain sometimes likes to bounce around posts while typing them, so my grammar can sometimes get funky. Thanks to Stefan for editing this to fix the grammar issues I missed. :)
References and Extra Information
Files for this post can be found in the blog-files repo, here.
I utilized netboot.xyz to deploy the Ubuntu server image to the Hyper-V VM I am using for this guide. If you don’t know what netboot/pxe boot is take a look at Technotim’s blog post about it! And don’t forget to sub to him on YouTube!
Footnotes
https://en.wikipedia.org/wiki/Tunneling_protocol#Secure_Shell_tunneling ↩︎
https://www.icann.org/en/accredited-registrars?page=1&country=United%20States%20of%20America&view-all=true ↩︎
https://caddyserver.com/docs/modules/dns.providers.cloudflare ↩︎
https://letsencrypt.org/docs/challenge-types/#dns-01-challenge ↩︎
https://www.authelia.com/integration/proxies/fowarded-headers/ ↩︎
https://caddyserver.com/docs/caddyfile/options#default-sni ↩︎