· Alexander · GitHub · 7 min read
GitHub Actions - Automatically Build Docker Containers
Building Docker containers in GitHub Actions

I used to run a local Jenkins set up to automatically build and push my custom docker containers to Docker Hub. This was complicated to set up and maintain. Jenkins would sometimes throw errors or a plugin update would break a workflow. To fix this headache I ended up moving my build environment to GitHub Actions. This also made it even easier to integrate configs via git as it was all in a single repository. This four part post series will get you up and running with GitHub Actions and Docker container building. The fourth part will demonstrate how to build and release a binary version. If you are just interested in the building process of the container image you can
We will be using Caddy as our base container for this post series. A lot of the building steps are already provided by the Caddy team which makes learning a bit easier.
The Environment
I will be running this series as if you were running on Windows 10/11 with Visual Studio Code installed. Now this series can also be followed fairly easily if you are running on a straight Linux setup or WSL. I am also assuming you have a general understanding of a command line interface and a vague familiarity with Docker. If you need more help leave a comment below and I will reach out!
Pre-Requisites
You should have these items created and set up before following this post.
- Create a GitHub account
- Create a GitHub account PAT
- Must have the Repo and Workflows scopes enabled.
- Create a Docker Hub account
- git-scm installed and configured.
insert Jerry Rig Everything “Let’s get started.”
Creating and Cloning the Repository
The first thing we need to do is get our repository up and going on GitHub. The easiest way to do this is to first create the repository on GitHub using the web interface. Can be public or private, choice is yours.
Creating a new repository on GitHubOnce your repository is created you’ll want to clone it to your environment. Open Windows Terminal (mine defaults to PowerShell 7 though the commands should be similar on older versions) and run the following commands:
#PowerShell 7.2mkdir $env.USERPROFILE/Documents/gitcd $env.USERPROFILE/Documents/gitNow clone the repository by running:
#PowerShell 7.2git clone https://github.com/yourusername/yourgitrepo.gitChange your directory to the newly cloned git repo.
#PowerShell 7.2cd $env.USERPROFILE/Documents/git/yourgitrepoCreating the Files
Now that we have our repository setup and cloned locally we can start adding files. Type code . inside the terminal while in the git repository to launch VSC. Once it’s launched create a new file called Dockerfile. Then copy the following into the new file:
# Get caddy image with builder tag as builder stepFROM caddy:builder AS builder
# Run xcaddy builder with plugins.# Plugins can be found here: https://caddyserver.com/download# Plugins in this template are:# caddy-dns/cloudflare, caddyserver/ntlm-transport, sjtug/caddy2-filter, greenpau/caddy-auth-portal, caddyserver/transform-encoderRUN xcaddy build --with github.com/caddy-dns/cloudflare --with github.com/caddyserver/ntlm-transport --with github.com/sjtug/caddy2-filter --with github.com/greenpau/caddy-auth-portal --with github.com/caddyserver/transform-encoder
# Get caddy alpine image to keep the container as small as possibleFROM caddy:alpine
# Copy caddy executable from builder stepCOPY --from=builder /usr/bin/caddy /usr/bin/caddyNext create a folder and call it .github, then navigate to that folder and create another folder and call it workflows. Now create a file inside the workflows/ folder called actions.yml. Your file path should look like this .github/workflows/actions.yml.
Copy the following into the newly created actions.yml file:
### This section defines the action ###
# Name of the actionname: Caddy
on: # Allows you to set off the action via a POST request to the GitHub workflow API repository_dispatch: types: caddy # Allows you to manually run the action from inside the Actions tab of the repo workflow_dispatch:
# See https://docs.github.com/en/actions/using-workflows/triggering-a-workflow for more options
### This section defines the job steps for the action ###jobs: build: runs-on: ubuntu-latest steps: - uses: actions/checkout@v2 # Login to Docker Hub using repo secrets - name: Docker Hub Login id: login_docker if: always() run: | echo ${{ secrets.DOCKER_HUB_PW }} | docker login -u ${{ secrets.DOCKER_HUB_USR }} --password-stdin # Build docker image using the Dockerfile - name: Build Docker Image id: build_docker if: success() run: | docker build -f ./Dockerfile -t ${{ secrets.DOCKER_HUB_USR }}/caddy:latest . # Push docker container to Docker Hub - name: Push Docker Image id: push_docker if: success() run: | docker push ${{ secrets.DOCKER_HUB_USR }}/caddy:latestVerify your new git repository looks like the following tree output:
gh-actions-blog-guide├── .github│ └── workflows│ └── actions.yml├── Dockerfile└── README.mdCreating GitHub Actions Secrets
Before we can run the actions pipeline, we need to setup our new repository with secrets. These secrets will be used to login to your Docker Hub account from inside the Actions CLI.
Obtaining an Access Token for Docker Hub
First login to your Docker Hub account and go to Account Settings > Security. Under Access Tokens click on New Access Token. Give it a memorable description and access permissions scope of Read & Write. Then click on Generate to generate the new token. It should look like the following image if you are successful. Copy the new token to a safe location as it is only displayed this one time.
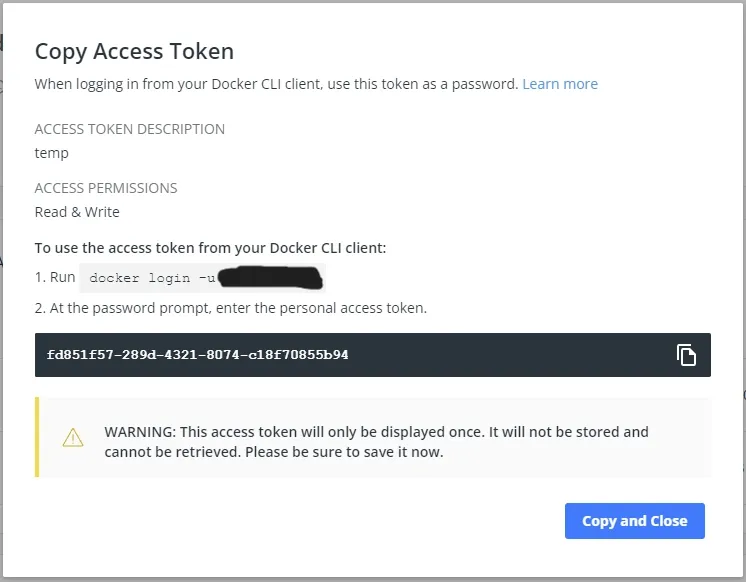 Creating a new access token in Docker Hub
Adding GitHub Repository Secrets
Navigate to your repository and go to Settings > Security > Secrets > Actions and then click on New repository secret. Create two secrets with the following info:
| Name | Value |
|---|---|
| DOCKER_HUB_USR | your docker hub username |
| DOCKER_HUB_PW | your docker hub access token from above |
If you are using GitHub’s container registry then use the following value setup:
| Name | Value |
|---|---|
| DOCKER_HUB_USR | your github username |
| DOCKER_HUB_PW | A github PAT with write:packages scope |
Once done your Actions secrets should look similar to this:
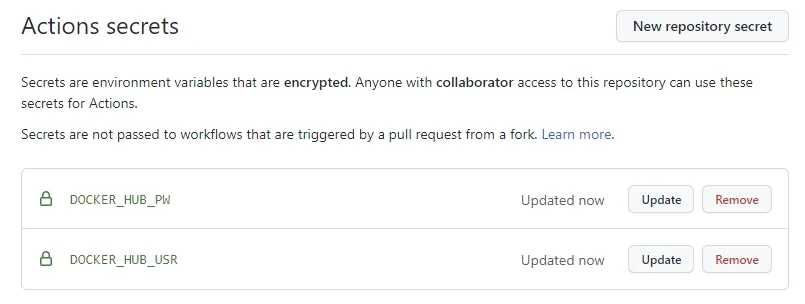 GitHub Actions secrets configuration
Running the Job
Now that we have everything ready we can push our local changes to GitHub. For this guide series, we will be working directly off of the main (master) branch. Run the following commands to push your changes.
# Adds all changed files/folders to commitgit add .
# Creates the commit with messagegit commit -m "First Commit"
# Pushes commits to the GitHub hosted repositorygit push
After pushing our changes we can verify the Action is running by navigating to the Actions tab in your repository on GitHib.
You will see a new entry in the list view similar to the one below.
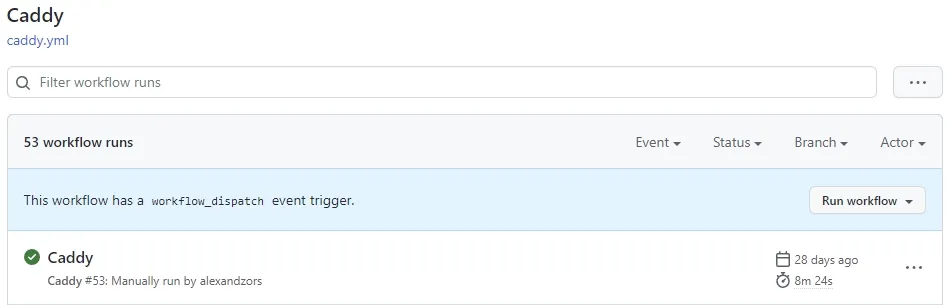 GitHub Actions tab showing workflow runs
Clicking on the item will bring you to the pipeline log. You can expand each of the steps to see what it did and if there are errors and what they are. The below image is from the actions pipeline for my Caddy image that also builds a executable binary. The red boxes are what you should see in yours.
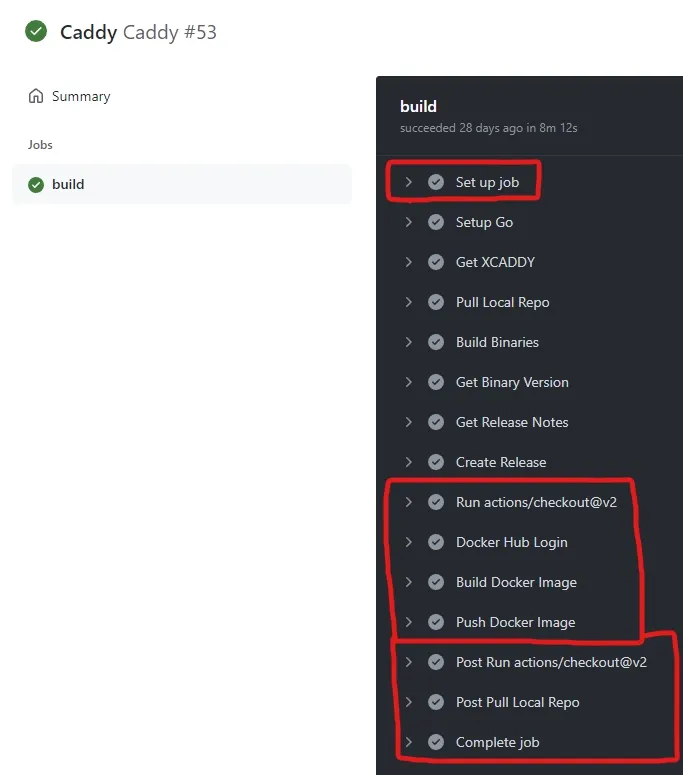 GitHub Actions pipeline execution view
Now that we have our base pipeline setup and functional we can start doing some more advanced things with it. Stay tuned for more posts in this series. For easy access check out the Guides tab. Let me know down below if you run into any trouble!
Thanks to my good friend Stefan for helping proof this post series!