· Alexander · Homelab · 7 min read
Logging Fail2Ban to Discord
Logging Fail2Ban to Discord using webhooks
Fail2Ban is a service that scans files like /var/log/auth.log, looking for failed authentication types and bans IPs that make repeated failed requests. It does this by updating firewall rules on the host to reject new connections from those IPs. It comes ready to go for reading many standard log files (sshd, Apache, etc) and is easily configurable for any other log files you want to scan for auth errors. Even though Fail2Ban is great at reducing the rate of incoming failed authentication requests, it is only one step in securing your host.
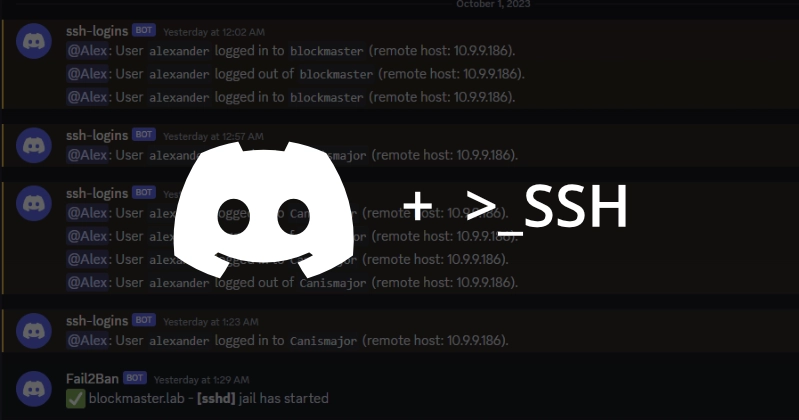
In my previous post, SSH Login Logging to Discord via Webhooks, we set up pam.d to log SSH logins to Discord over a webhook. We can also do this with Fail2Ban using a custom action. If you already have Fail2Ban installed you can skip ahead to the configuration.
Installing Fail2Ban
First update your package repositories and then install Fail2Ban.
sudo apt update && sudo apt install fail2banNow verify if Fail2Ban was installed correctly you can check the status of the fail2ban service. Since it is not configured yet, it won’t be running.
systemctl status fail2ban.service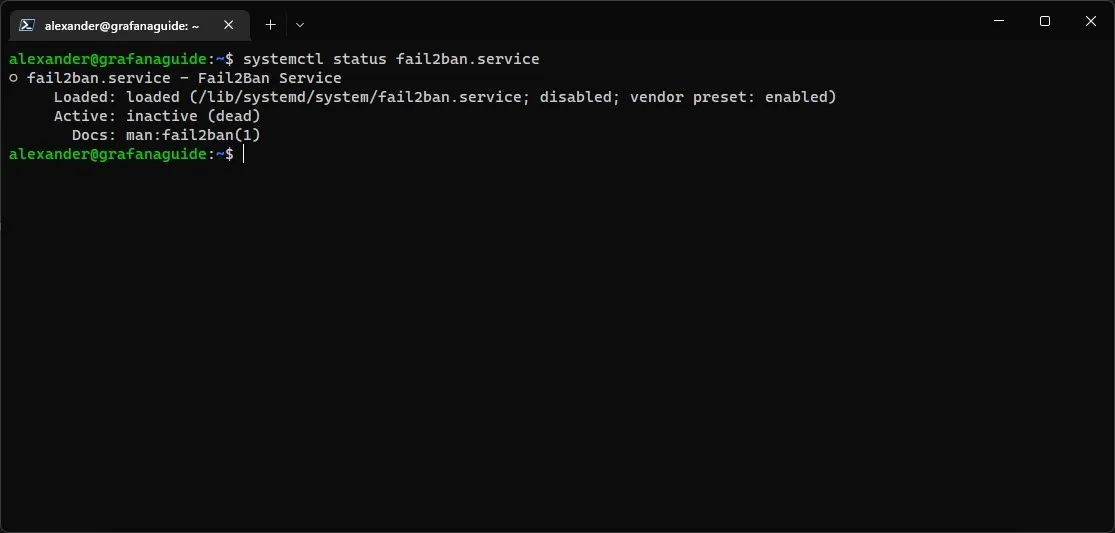 Output of the
 systemctl status command showing the status of the Fail2Ban service
Configuring Fail2Ban
Now that Fail2Ban is installed we can configure it to log to Discord. First let’s create our /etc/fail2ban/jail.local to tell Fail2Ban what to do.
sudo cp /etc/fail2ban/jail.conf /etc/fail2ban/jail.local# using -l with nano gives you line numbers making it easier to read files.sudo nano -l /etc/fail2ban/jail.localHit CTRL+W and type “bantime.increment” and hit ENTER. Uncomment the line by deleted the # at the beginning of it and set the value to true.
bantime.icrement example:
# "bantime.increment" allows to use database for searching of previously banned ip's to increase a# default ban time using special formula, default it is banTime * 1, 2, 4, 8, 16, 32...bantime.increment = trueHit CTRL+W and type “ignoreip” and hit ENTER. Uncomment the line and verify that the IPs listed are the local IPs 127.0.0.1/8 ::1. Then add a space at the end and add your local network subnet.
ignoreip example:
# "ignoreip" can be a list of IP addresses, CIDR masks or DNS hosts. Fail2ban# will not ban a host which matches an address in this list. Several addresses# can be defined using space (and/or comma) separator.ignoreip = 127.0.0.1/8 ::1 10.9.9.0/24 10.8.8.0/24Hit CTRL+w again and search for “sshd”.
Replace:
port = sshlogpath = %(sshd_log)sbackend = %(sshd_backend)sWith:
enabled = trueaction = discord_notifications iptables-allportsport = sshlogpath = %(sshd_log)sbackend = %(sshd_backend)sHit CTRL+x and then y to save and close the jail.local file.
Creating the Discord Action
Now that we have our /etc/fail2ban/jail.local file we can create the /etc/fail2ban/action.d/discord_notifications.conf action. First we need to get a webhook URL from Discord. To do this open Discord and navigate to the channel settings of the channel you want to log to. Open the integration settings and create a webhook. Give it a name you’ll recognize and copy the url.
sudo nano /etc/fail2ban/action.d/discord_notifications.confCopy the following contents into the file:
# discord_notifications.conf# Fail2Ban Discord Webhook Action# Updated By: Alex from https://blog.alexsguardian.net# Author Source: Gilbn from https://technicalramblings.com# Original Source: https://gist.github.com/sander1/075736a42db2c66bc6ce0fab159ca683# Create the Discord Webhook in: Server settings -> Webhooks -> Create Webhooks
[Definition]
# Notify on Jail Startupactionstart = curl -X POST "<webhook>" \ -H "Content-Type: application/json" \ -d '{"username": "Fail2Ban", "content":":white_check_mark: <hostname> - **[<name>]** jail has started"}'
# Notify on Jail Shutdownactionstop = curl -X POST "<webhook>" \ -H "Content-Type: application/json" \ -d '{"username": "Fail2Ban", "content":":no_entry: <hostname> - **[<name>]** jail has been stopped"}'
# Notify on Banactionban = curl -X POST "<webhook>" \ -H "Content-Type: application/json" \ -d '{"username":"Fail2Ban", "content":":bell: <hostname> - **[<name>]** **BANNED** IP: `<ip>` for <bantime> hours after **<failures>** failure(s). Here is some info about the IP: https://db-ip.com/<ip>. Unban by running: `fail2ban-client unban <ip>`"}'
# Notify on Unbanactionunban = curl -X POST "<webhook>" \ -H "Content-Type: application/json" \ -d '{"username":"Fail2Ban", "content":":bell: <hostname> - **[<name>]** **UNBANNED** IP: [<ip>](https://db-ip.com/<ip>)"}'[Init]
# Name of the jail in your jail.local file. default = [your-jail-name]name = default
# Discord Webhook URLwebhook = <discord_webhook_url>hostname = <hostname>Replace <discord_webhook_url> with the full webhook url you created earlier. Then update the <hostname> with the name of the host you are running fail2ban on.
Example:
# Discord Webhook URLwebhook = https://discord.com/api/webhooks/17590182726070/AUJHWITUGHAIWUTYIAYWIT27617-Adg-hawuthawuhgiautgwaitgawiuthostname = lab_host_1Hit CTRL+x then y to save and close the file.
Starting and Testing Fail2Ban
With everything configured we can now start up the fail2ban service and then check it’s status.
sudo systemctl start fail2ban.servicesystemctl status fail2ban.service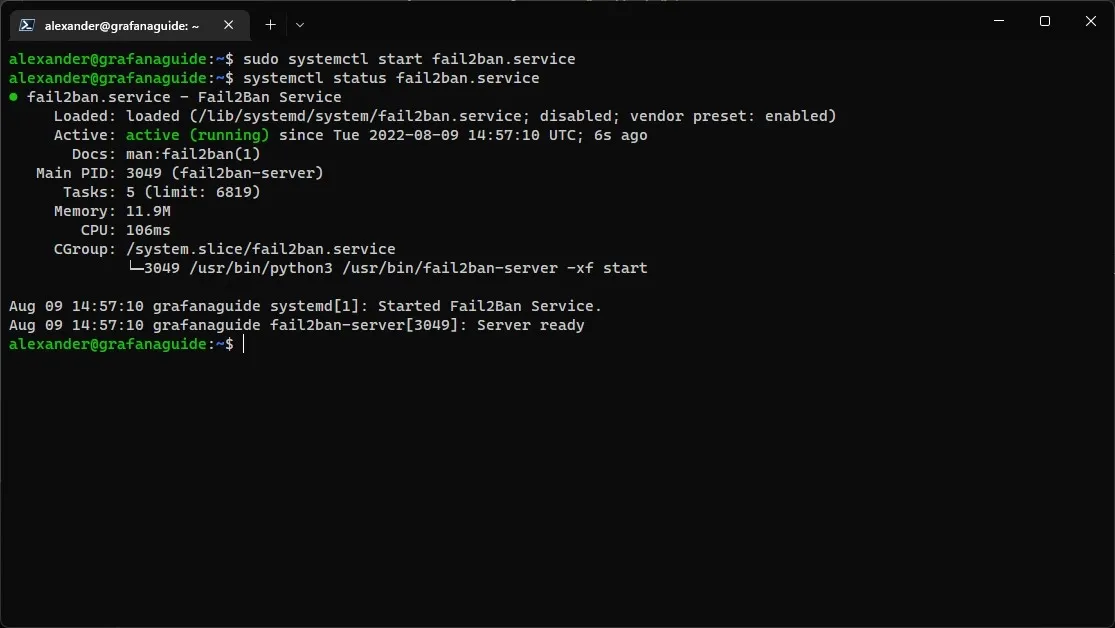 Output of the
 systemctl status command showing the running status of the Fail2Ban service
In your Discord channel you should see a new message from your webhook user stating that the “[sshd] Jail has started” for your host.
![]() Discord channel message stating that the [sshd] jail has started
Discord channel message stating that the [sshd] jail has started
Now to test Fail2Ban (without another host/network) we need to edit our jail.local config file again and remove our IP address from the ignoreip list as well as update the ban time so we don’t have to wait long.
sudo nano /etc/fail2ban/jail.localHit CTRL+w and type “ignoreip =” then hit ENTER
Edit the line and remove your ip subnet so it looks like the following:
# "ignoreip" can be a list of IP addresses, CIDR masks or DNS hosts. Fail2ban# will not ban a host which matches an address in this list. Several addresses# can be defined using space (and/or comma) separator.ignoreip = 127.0.0.1/8 ::1Hit CTRL+w again and type “bantime =”. Change the line to ”30s”.
bantime example:
# "bantime" is the number of seconds that a host is banned.bantime = 30sHit CTRL+x then y to save and close the file. Now restart the fail2ban service.
sudo systemctl restart fail2ban.serviceYou will see two notifications in your Discord channel. One stating the “[sshd] jail stopped” and then a follow up one stating “[sshd] jail started.”
 Discord channel messages stating that the [sshd] jail has stopped and started
Open a new terminal session on a different device (or the one you are using already if you are not on the device using fail2ban) and open a new ssh session.
Try and login as root a few times with incorrect info. By default its 5 times before a ban happens.
ssh root@ipYou should see a ban message show up in your Discord channel and then 30s later an unban message.
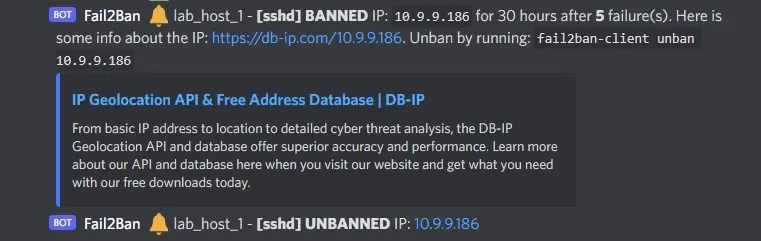 Discord channel messages showing ban and unban of an IP
Once you confirm it is working you can re-edit your /etc/fail2ban/jail.local config file and update the bantime = option back to the value you want (default is 10m though, I usually set it for 24h). Also make sure to update ignoreip = to include your subnet / IP again.
Extras and Conclusion
If you want to get an @ notification when a host is banned you can update the /etc/fail2ban/action.d/discord_notifications.conf action to include an @ in the payload. To do this edit the file and replace:
-d '{"username":"Fail2Ban", "content":":bell: <hostname> - **[<name>]** **BANNED** IP: `<ip>` for <bantime> hours after **<failures>** failure(s). Here is some info about the IP: https://db-ip.com/<ip>. Unban by running: `fail2ban-client unban <ip>`"}'with:
-d '{"username":"Fail2Ban", "content":"<@your-discord-user-id> :bell: <hostname> - **[<name>]** **BANNED** IP: `<ip>` for <bantime> hours after **<failures>** failure(s). Here is some info about the IP: https://db-ip.com/<ip>. Unban by running: `fail2ban-client unban <ip>`"}'Make sure to replace the <@your-discord-user-id> with your actual ID. If you do not know how to obtain this you can read the Discord docs, here, for more info.
If you have any questions please reach out via the comments down below or shoot me an email!
Happy banning!